We may earn a commission if you make a purchase through the links on our website.
Active Directory Backup – Easy & Fast Way to Backup your Domain!

UPDATED: March 21, 2023
In this post, you are going to learn how to do a Manual backup of an Active Directory domain controller. First, we are going to install the Windows Server Backup Feature, which is a new tool that started with Windows Server 2016.
This feature is easy to use and can help you set up manual, scheduled, full, or custom AD backups. We are going to perform a “customized” System State backup that includes the most important components needed to restore Active Directory.
Active Directory is critical for any Windows environment. So as a best practice, it is recommended to perform full scheduled backups. For now, we’ll keep it simple and start with the basics.
Active Directory Backup Recommendations
- Always Backup System State When planning for a backup strategy, it is important to consider the elements that influence AD. At least always backup the System State, which includes DNS Server, Windows System Files, DC Registry, Sysvol directory, COM+ Class Registration Database, Certificate Services Database, etc.
- DC Failover and Backup If you have only One Domain Controller in the network, backup immediately! If you have more than one, which is recommended for fail-over protection, backup at least one DC. Although a fail-over solution could give you fault tolerance for AD, ALWAYS perform a Backup. The ideal DC to backup should be the one running the FSMO (Flexible Single Master Operation) role.
- Perform Backups on a Regular Basis You should back up AD with time intervals lower than 60 days; this is because, by default, the lifetime of AD tombstones are set to 60 days. Tombstone is a “deleted object” that remains in the database for 60 days. After the 60 days pass, the object disappears completely. If possible backup Active Directory every day. You can create incremental backups by using a Windows Server Backup feature called Volume Shadow Copy Service (VSS).
- Restoring from a Backup Should be the Last Option A handy tool to avoid restoring is the Active Directory Recycle Bin. When you delete an object, it automatically goes to the Recycle Bin. So if you want to recover a particular object that you recently deleted, go to the bin and restore it.
- Follow the 3-2-1 Backup Rule Keep 3 copies of your Backup – 2 Backups on Locally on different media (hard-drives, etc) and 1 Backup off-site (on a remote server, or in the cloud).
How to Backup Active Directory in Windows Server 2019
Active Directory is one of the most important components in any Windows network. When AD crashes, Everything comes to a Halt. Having no protection or backup strategy whatsoever could put the entire organization in danger – Believe it or not, Many small businesses don't regularly backup Active Directory.
Make sure to have multiple domain controllers working together with fail-over functionalities and create a good backup and recovery strategy.
Step 1. Understanding the Backup Environment
The environment for our backup is as follows:
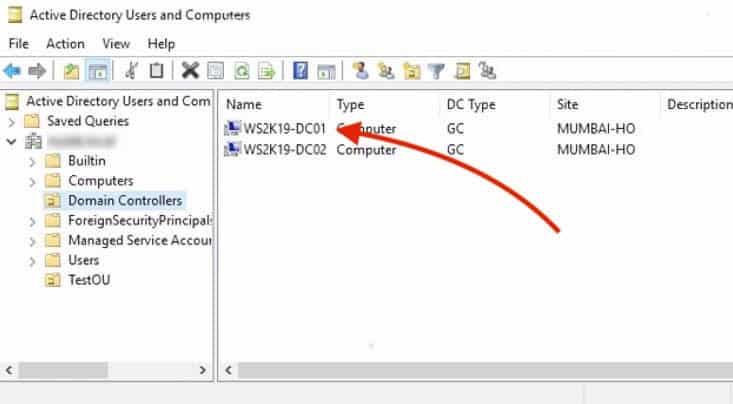
In this demonstration, we have two Domain Controllers (DC), one is called WD2K19-DC01 and the other WD2K19-DC02.
To see the DCs, you can go to the Active Directory Users and Computers (ADUC) snap-in console on the Windows Server.
- Click on the Domain Controllers container on the right hand.
- This will show you the current DCs, along with Type, DC Type, Site, and Description. As you can see, there are two DCs: WD2K19-DC01 and WD2K19-DC02.
- We are going to perform the backup on the domain controller, WD2K19-DC01.
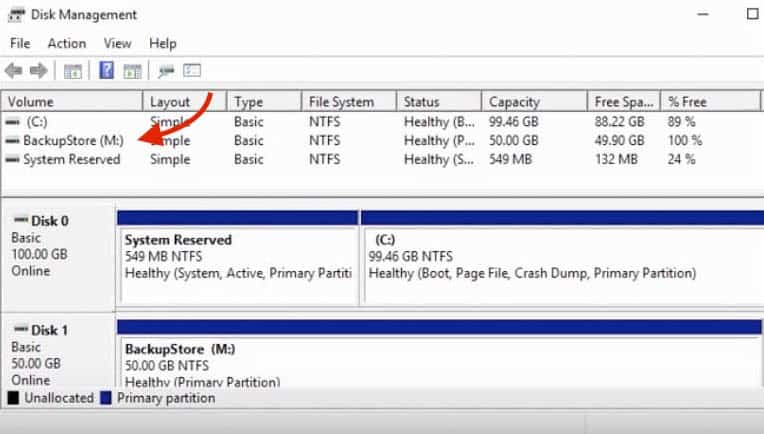
- Before performing the backup, it is recommended to have enough available storage for the specific backup/restore. You can use the Disk Management system utility in Windows to view your available storage.
- In this lab, we are going to attach a new disk called “BackupStore (M:)” to store the DC backup.
Step 2. Configuring the Shadow Copy Service (VSS) on the Volume
To create the backup copy of the DC even when the volume “BackupStore (M:),” is being used, configure the Shadow Copy (or Volume Snapshot Service, “VSS”).
The Shadow Copy helps backup data on the volume even while applications that produce data are still running.
It also allows the users to view the contents of shared folders as the content existed in previous points in time (Snapshots).
- For this lab, we are only going to change the Shadow Copy size limit configuration on the volume where we are going to store the AD database.
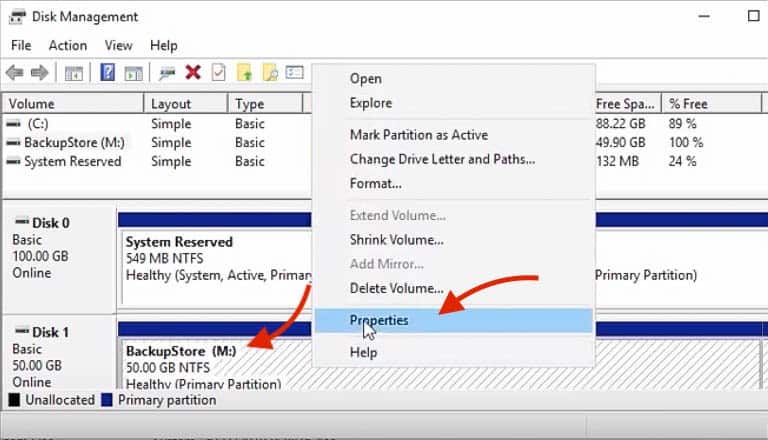
- Go back to Disk Management. Then Right-click on the BackupStore (M:) and go to Properties.
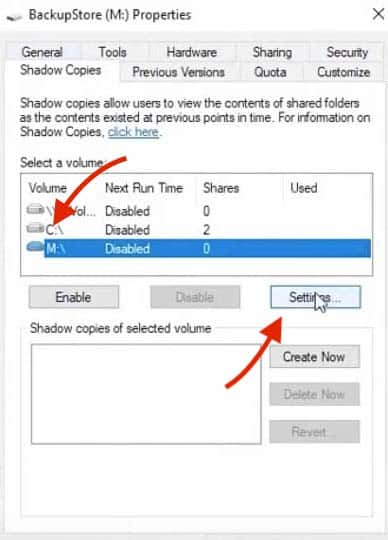
- Go to the “Shadow Copies” tab. Select the volume where you are going to store the backup, which in this case is (M:), and then click “Settings“.
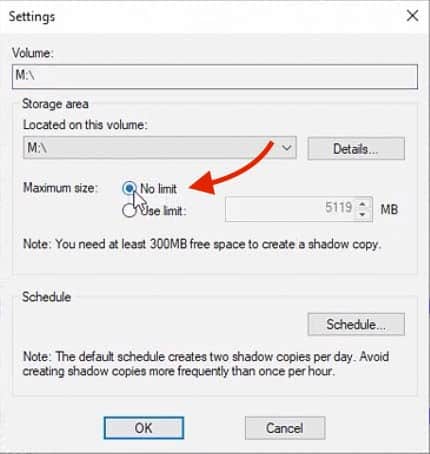
- In the Shadow Copies Settings section, just select the No limit as the Maximum Size, as seen below in the screenshot. This option will allow all the space available in the volume for the AD backup.
Step 3. Installing the Windows Server Backup Feature
Windows Server 2019 comes with the Windows Server Backup feature, which is essentially the same as Windows Server Backup 2016.
This feature can help you perform Active Directory database backups and restores.
Although many third-party tools help you deliver Active Directory backup and restore, the Windows Server Backup Feature is easy to use and is already bundled with Windows Server – and most importantly, 100% FREE.
So if you haven’t used the backup feature yet, you will likely have to install it first.
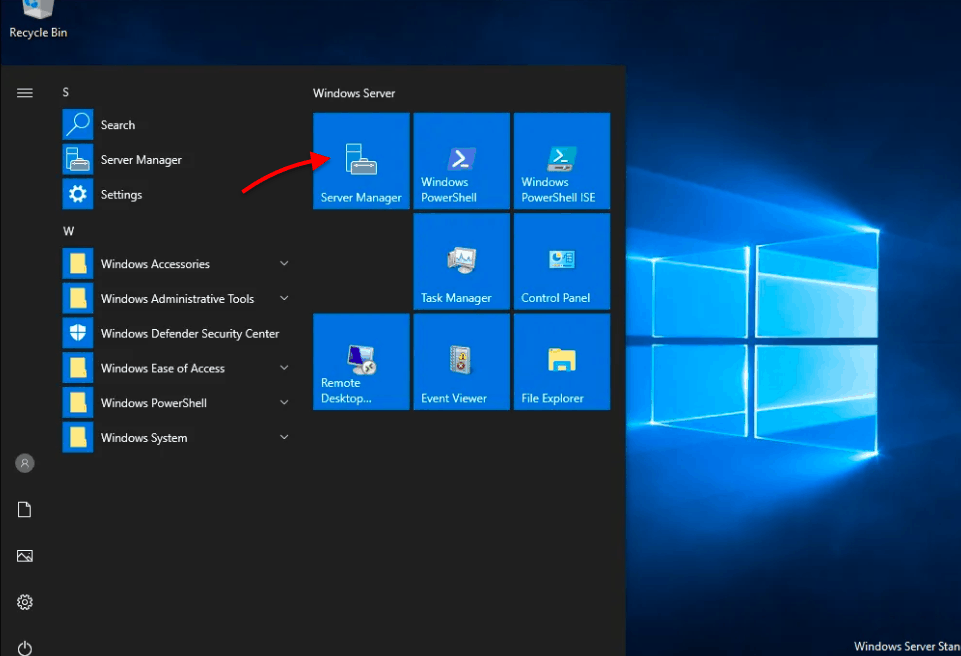
The way to install this feature is through the Server Manager.
- Open the Server Manager console.
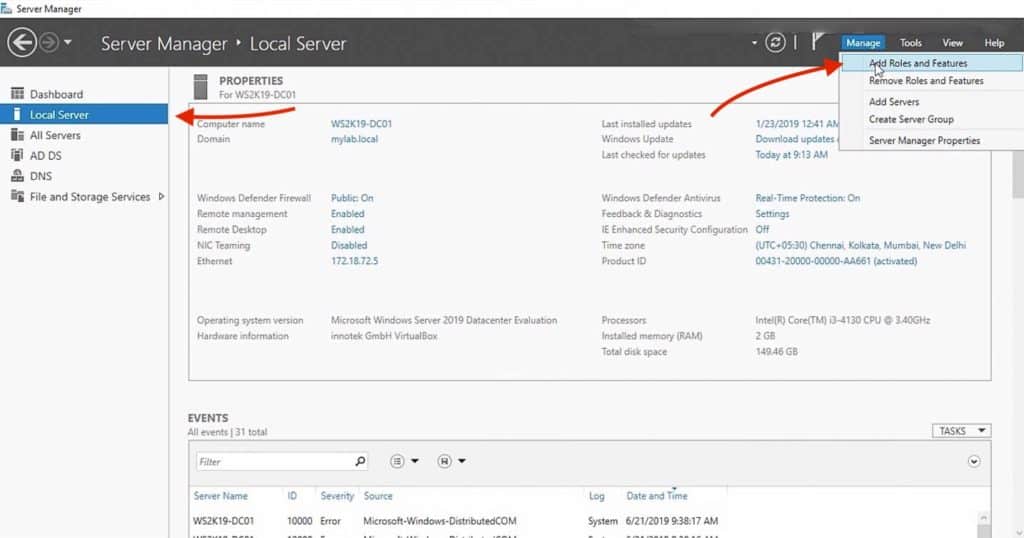
- Select your Local Server. Go to the Manage tab on the right upper-hand and click on the Add Roles and Features as seen in the image below.
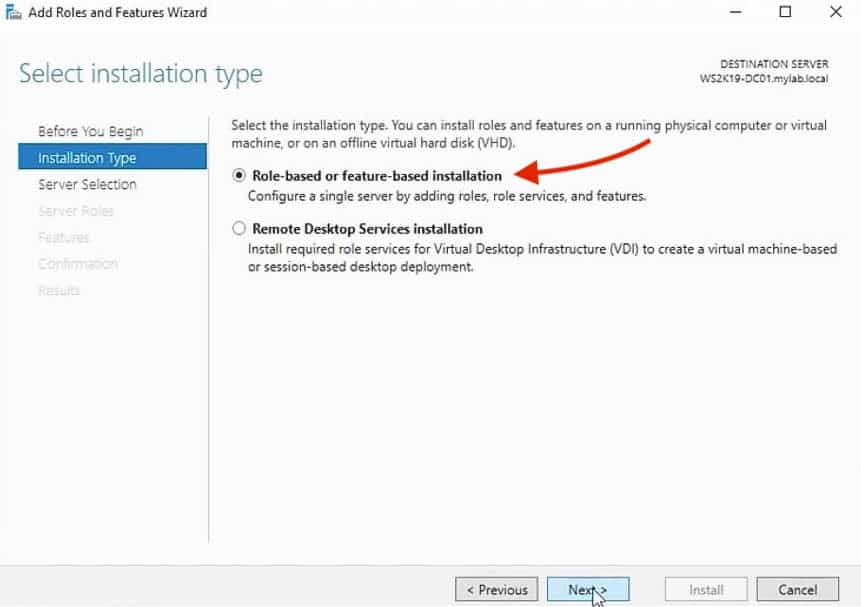
- This will open the Add Roles and Features Wizard – Here you’ll see the Installation Type screen. Select the Role-based or feature-based installation and click Next.
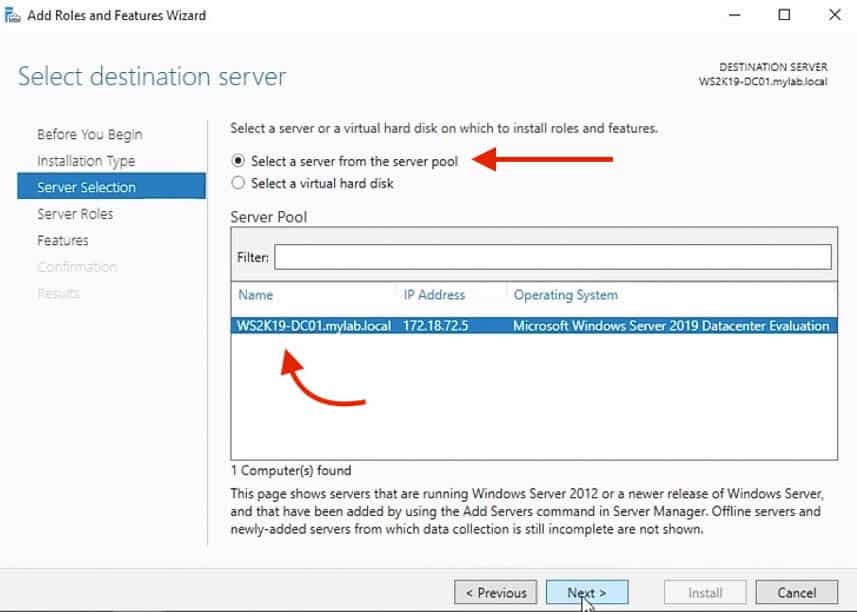
- The next screen will let you select the server on which you want to install the feature. Windows will automatically display the server pool. In this case, we are going to select the local server, which is WD2K19-DC01-mylablocal.
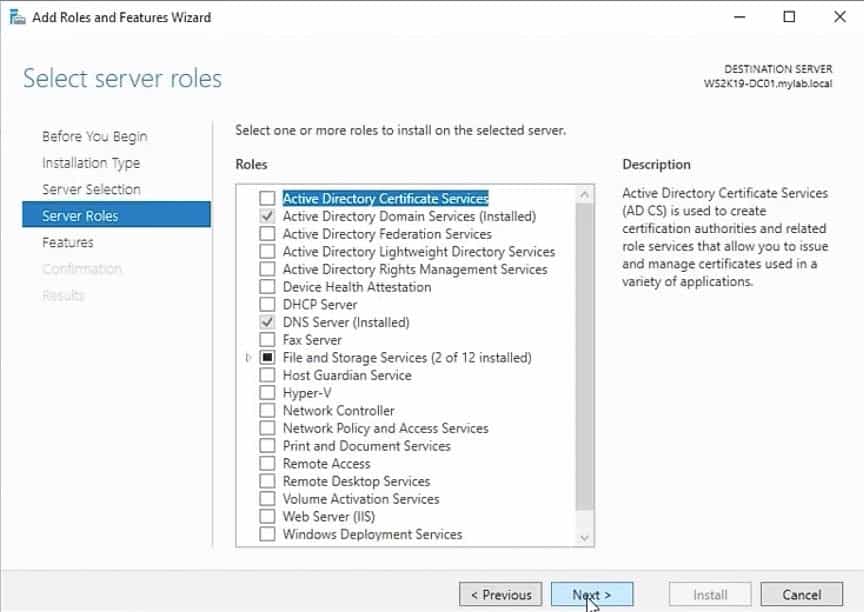
- In the next screen, you can select the roles to install on the server. We are installing a feature, so you can continue to the next screen.
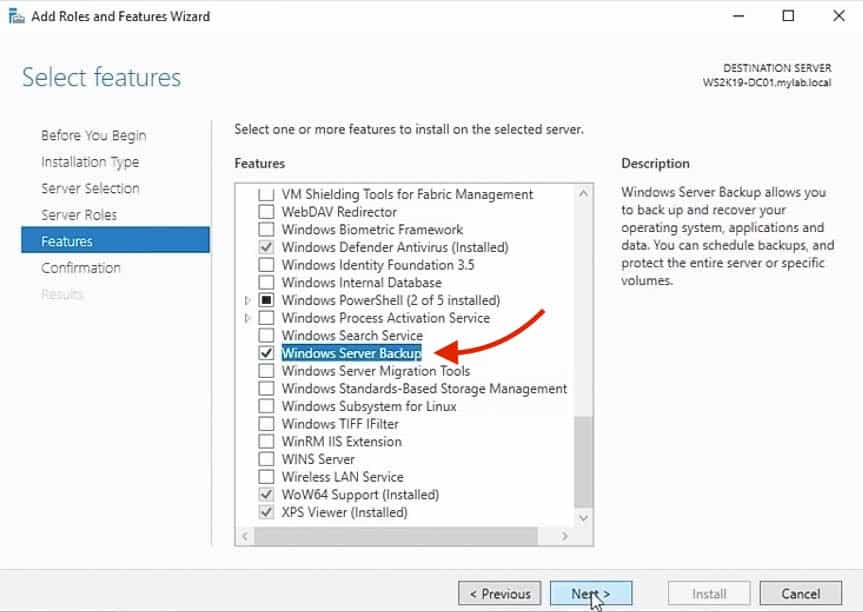
- In the Features screen below, you’ll need to Find and Select the Windows Server Backup feature, as seen in the screenshot below.
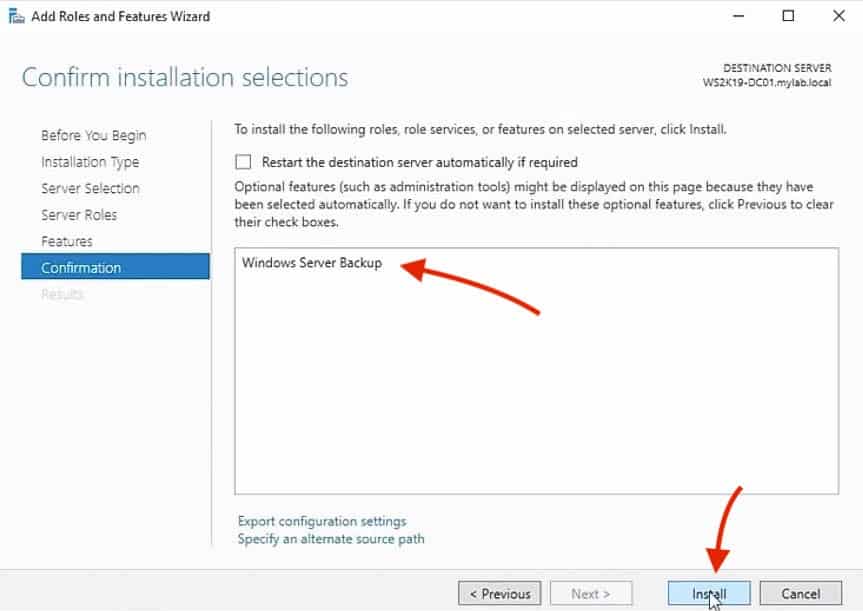
- Confirm your installation. Make sure that the Windows Server Backup feature is on the screen and click on the Install button to begin the installation.
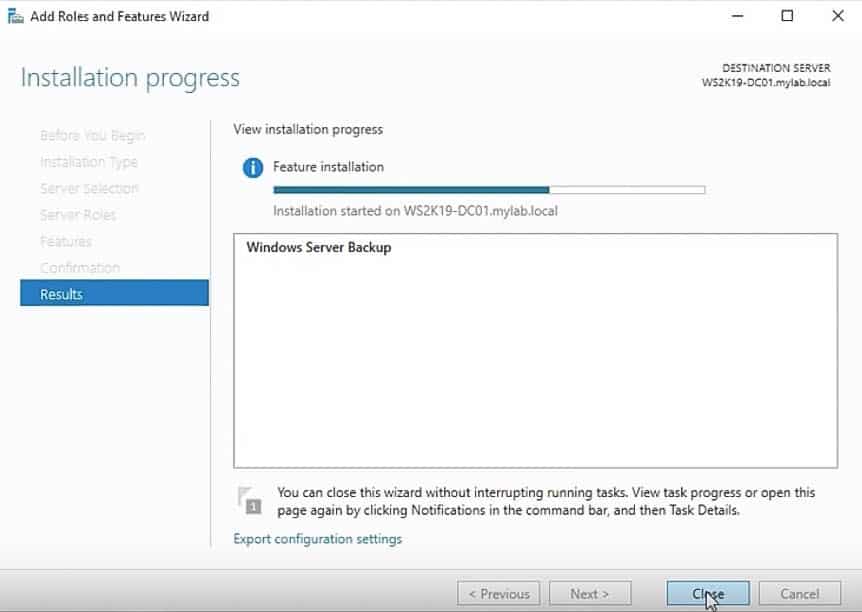
- The feature will begin to install on your local server. Once the installation has been completed, you can close the console.
Step 4. Performing the Backup on AD
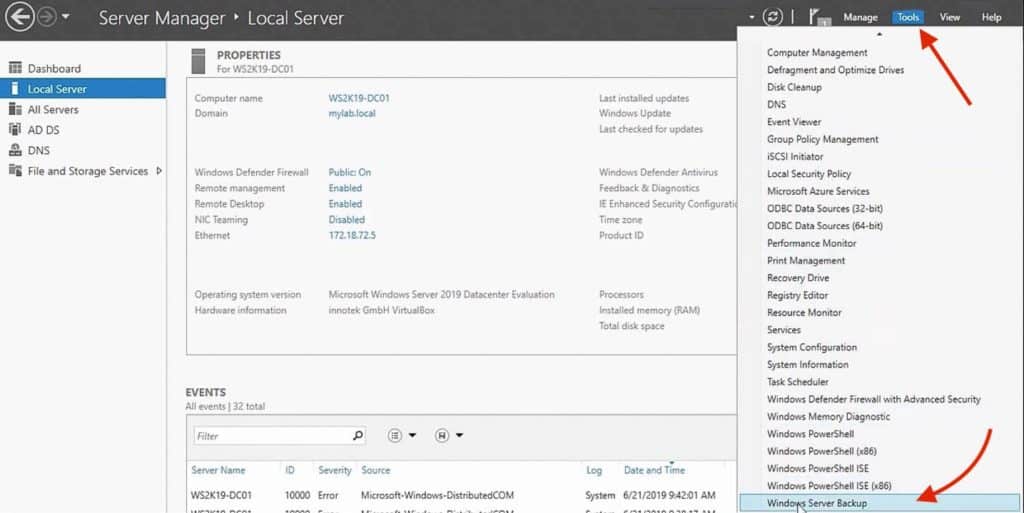
- Go back to the Server Manager. On the top right hand, select Tools and open the Windows Server Backup. You can also open this console by running the command wbadmin.msc on the Windows Run (Ctrl+R).
- Once, you open the Windows Server Backup, you’ll be able to see scheduled backups and last backup status. Since this is the first time we do a backup here, you will not see any details.
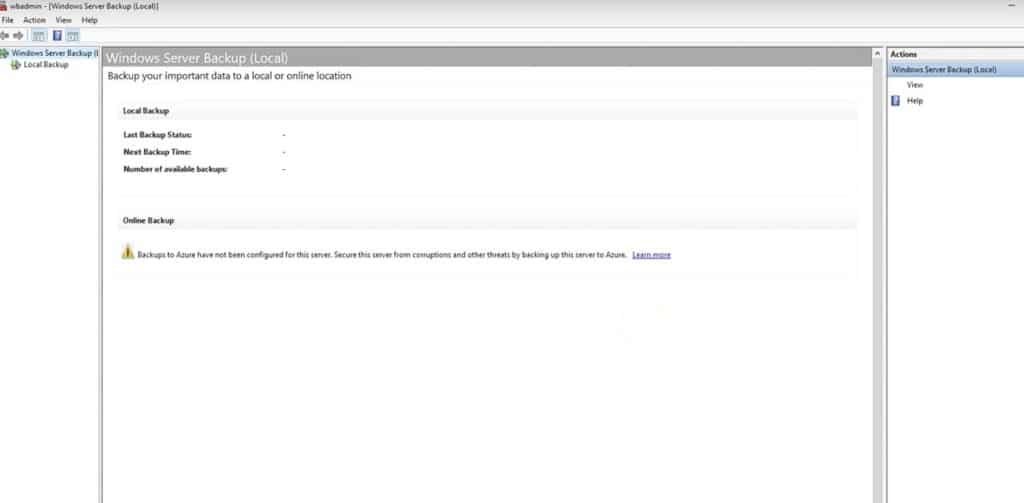
- From the same console, go to Local Backup – Here you’ll see that there is no backup configured or no backup currently running for the local Domain Controller.
Although you can also create an automatic scheduled backup to run daily or weekly at different hours, for this demonstration we are going to create a manual backup.
To begin a manual AD database backup, go to Backup Once, on the right-hand window.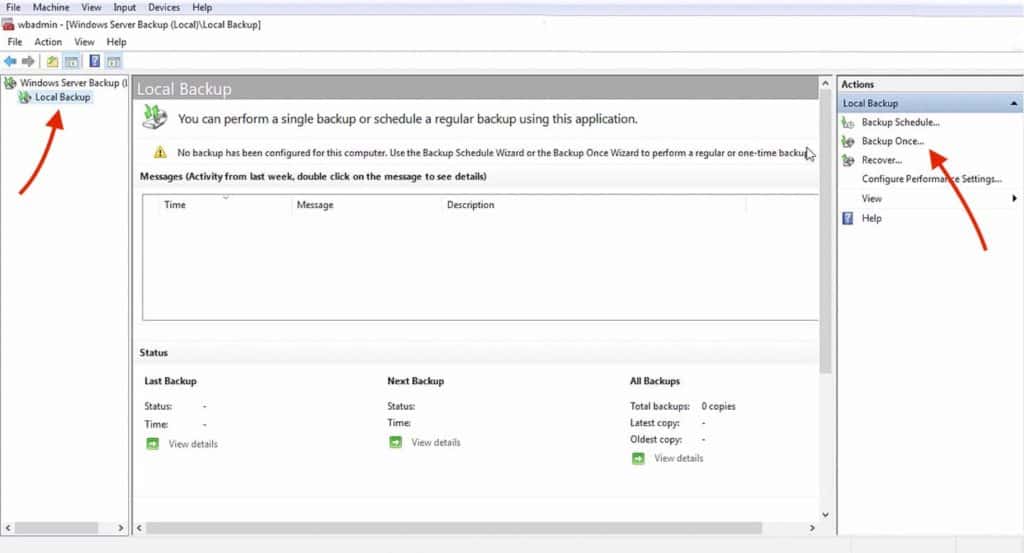
- The Backup Once option will let you configure all the details of your Backup, such as backup items and destination.
In the first screen, Backup Options select Different Options – The Scheduled Backup Options is grayed out because we are only doing a manual backup.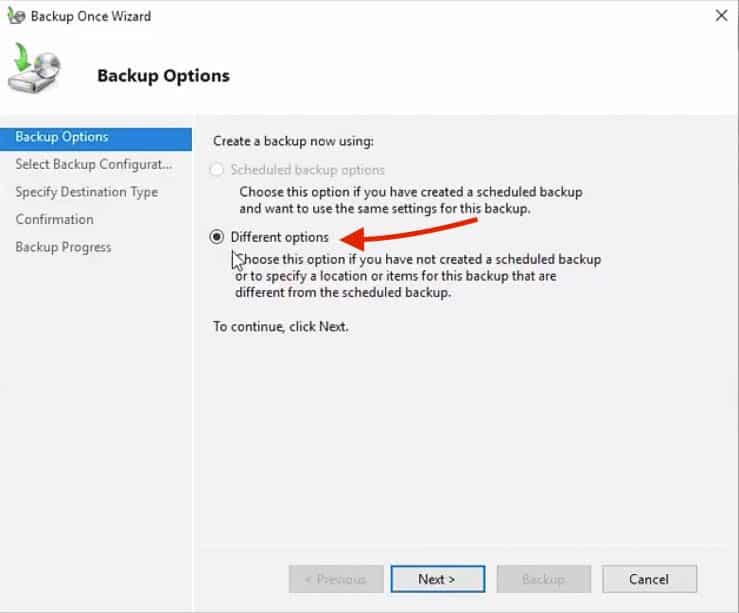
- In the next screen, Select Backup Configuration and you’ll have two options,
– Full Server (recommended)
– Custom
As you may notice the Full Server backup is the recommended option, as it creates a copy of all the server data, including applications, and the system state.But for this time, we’ll only backup System State – So click on Custom and click Next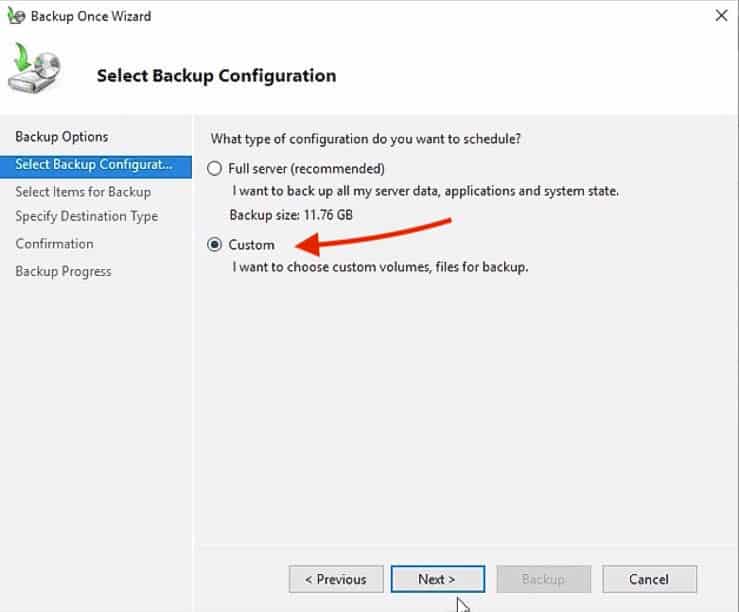
- In the Select Items for Backup screen, you’ll specify the items that you want to include in the backup.
Items can be Bare Metal Recovery, System State, System Restore, or any other volume on the server.
For now, there are no items specified on the backup; so go ahead and click on Add Items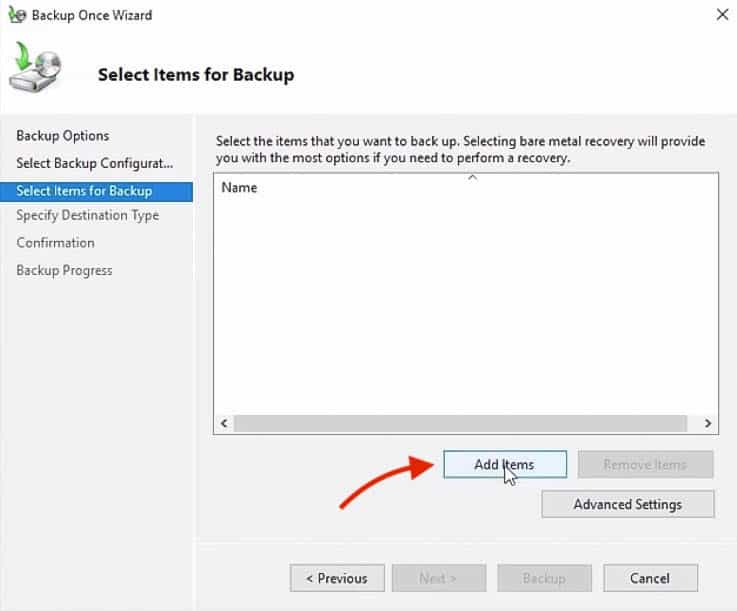
- In this backup, we are going to choose the System State Backup item, which is a copy of the most important Operating System components.
The “System State Backup” components include:
- Windows System Registry.
- Performance Counter Configuration
- Component Services Class database
- Boot and system files.
- Active Directory Database
- Certificate Services.
- Sysvol file.
8. Go ahead and check the box “System State,” and click “Ok“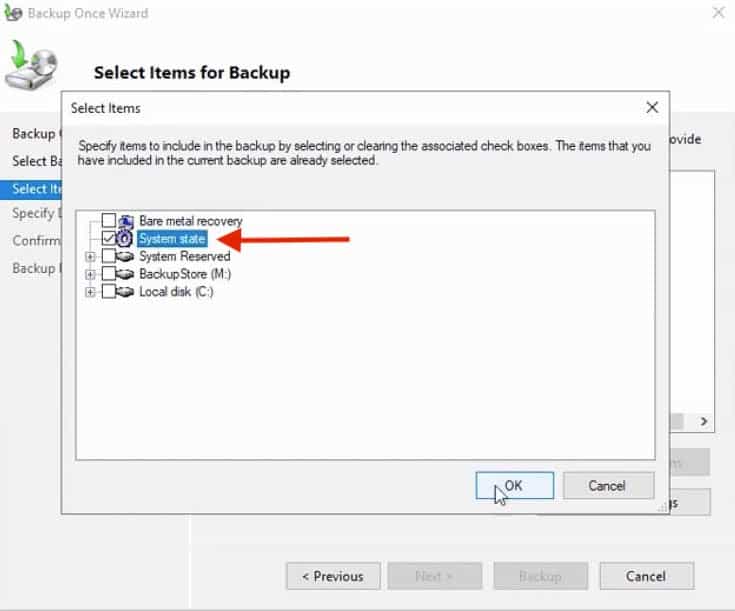
9. You’ll see the “System State” item on the list for Backup.
Now we are going to configure the Volume Shadow Copy Service (VSS) for this backup item.
Go ahead and click on “Advanced Settings“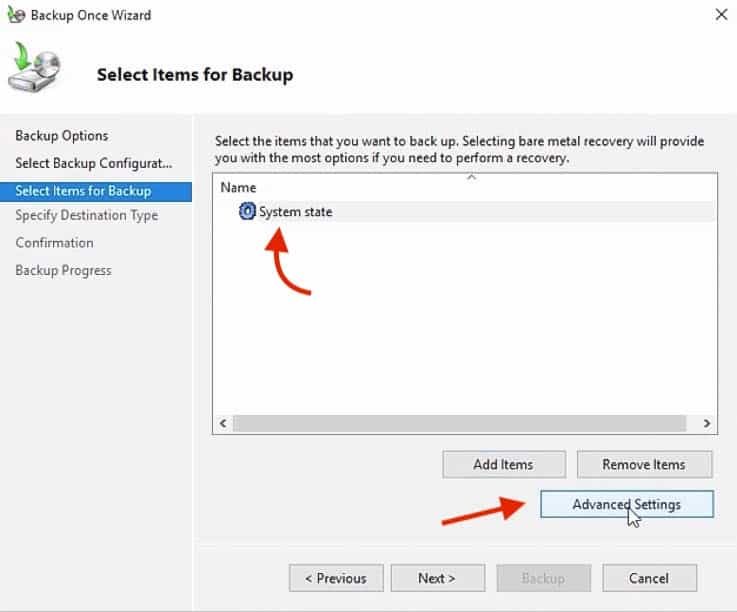
10. In Advanced Settings, go to the VSS Settings.
Here you’ll be able to choose the type of VSS backup that you’ll be creating.
Since we are not using any third-party application to perform the backup, select the “VSS Full Backup”
This option allows you to create a backup of all the files.
After the VSS Full Backup is finished, the backup application may shorten logs or change files.
The VSS Copy Backup on the other hand also does a full backup but preserves all the application files including logs on the system.
This option is the preferred method for incremental backups, as it does not affect the sequence of backup.
In other words, it prevents AD data from being modified while the backup is in progress.
The VSS copy backup can’t be used for starting an incremental backup (or restore).
So, since this is the first backup and we are not using any third-party backup tool, we’ll go for the “VSS Full Backup” option.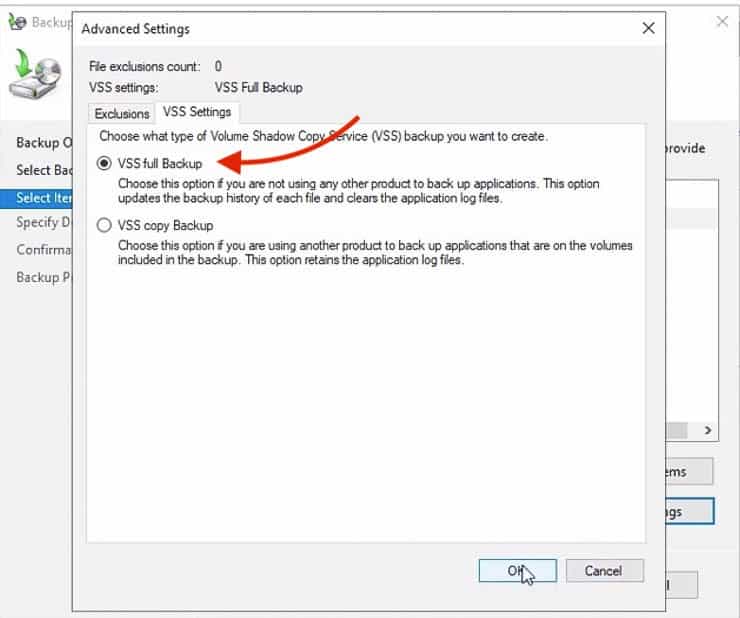
11. In the next screen, “Specify Destination Type” you’ll need to select the type of storage for the backup.
Here you’ll be able to choose between Local Drive or Remote Shared Folder.
For the purpose of this demonstration, we are using a local hard disk to store the backup.
So choose “Local Drives” and click “Next“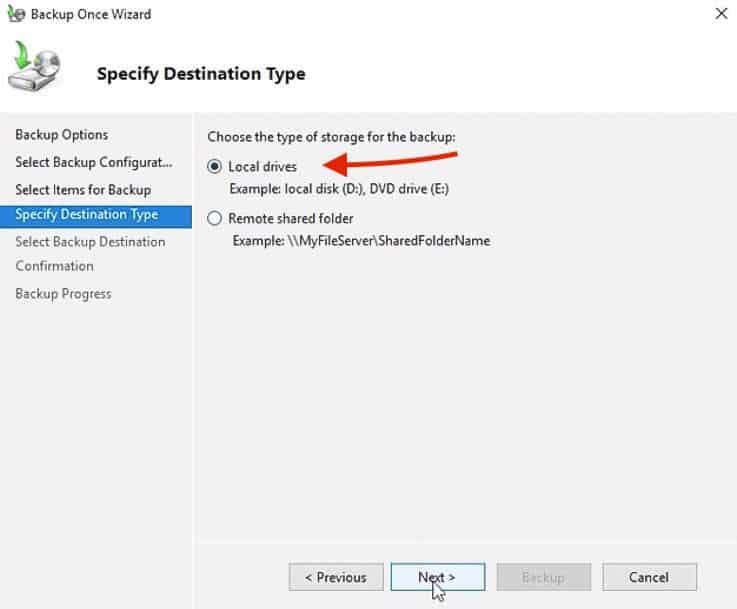
12. In the next screen, “Select Backup Destination” you can choose the partition where you want to store the backup.
By default, the “BackupStore M:” is already selected.
So make sure to select the right destination and click “Next“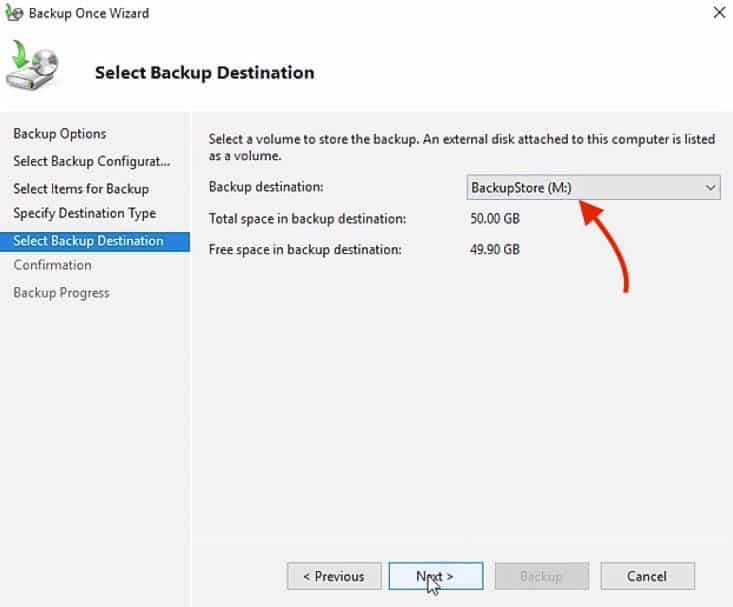
13. The next screen “Confirmation“, lets you double-check that all backup parameters are set correctly.
Once, you are ready, click the “Backup” button. 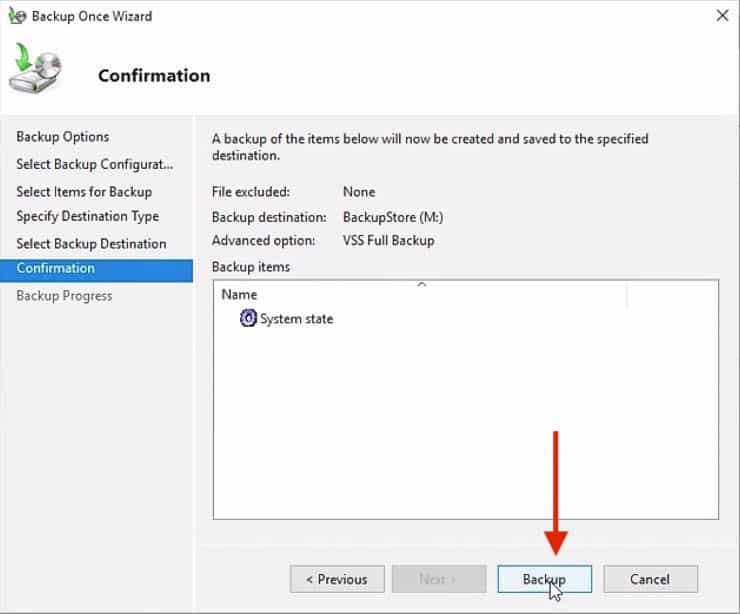
14. The backup should take some time depending on the size of the domain controller server.
Once the backup is completed successfully, you can close the Backup Console.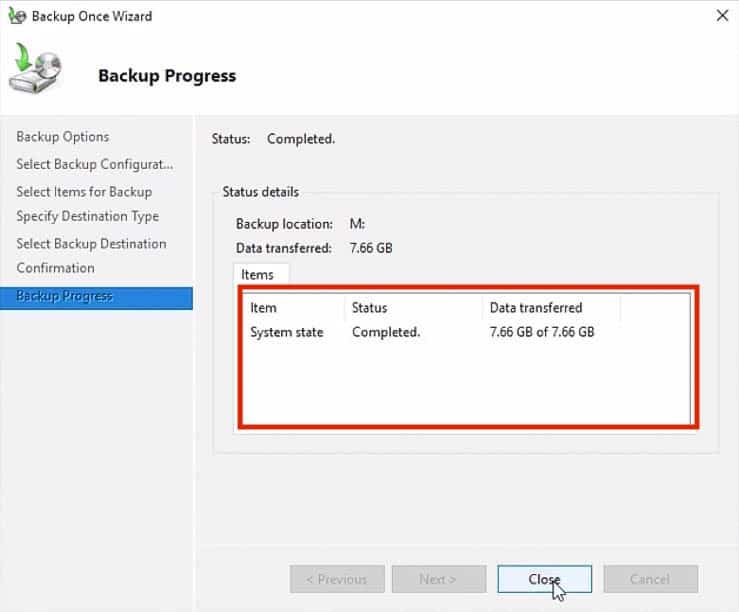
15. If you closed the Backup Wizard without waiting for the last message status, the backup will continue to run on the background.
You can also confirm the status and completion results of the backup from the webadmin console (or Windows Server Backup Feature).
The console will display a message with information from this backup (and others).
It will show the timestamp, type, and results.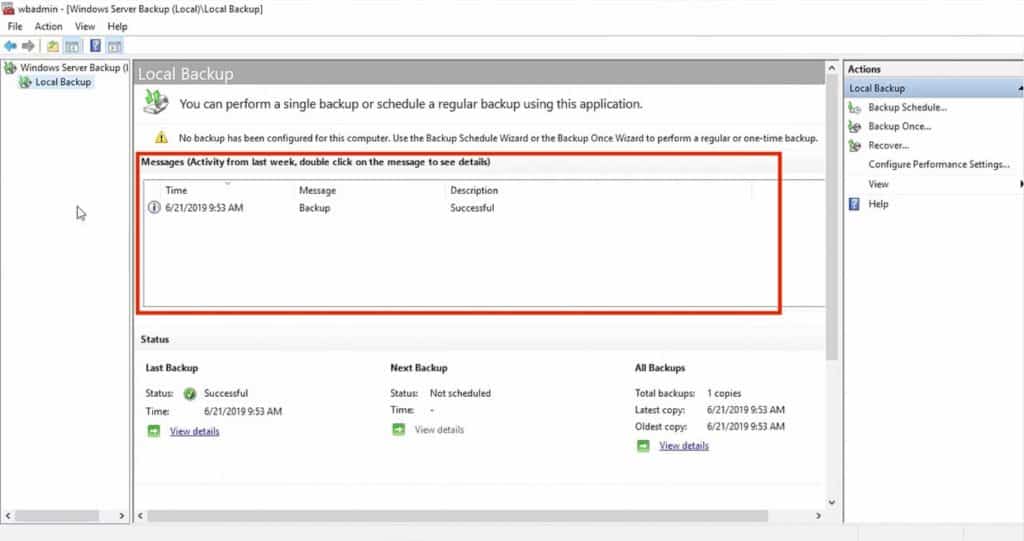
Backup Active Directory with third-party tools
Setting up automated backups for AD is just one of the tasks you will need to perform in order to get your access rights management solution running well through Active Directory. If you use different implementations of AD, you will need to log into several consoles to set this backup system up and check on its status. It is a lot simpler to use a frontend for all of your AD implementations that will manage all domain controllers by replicating the objects and settings that you have managed through that single console.
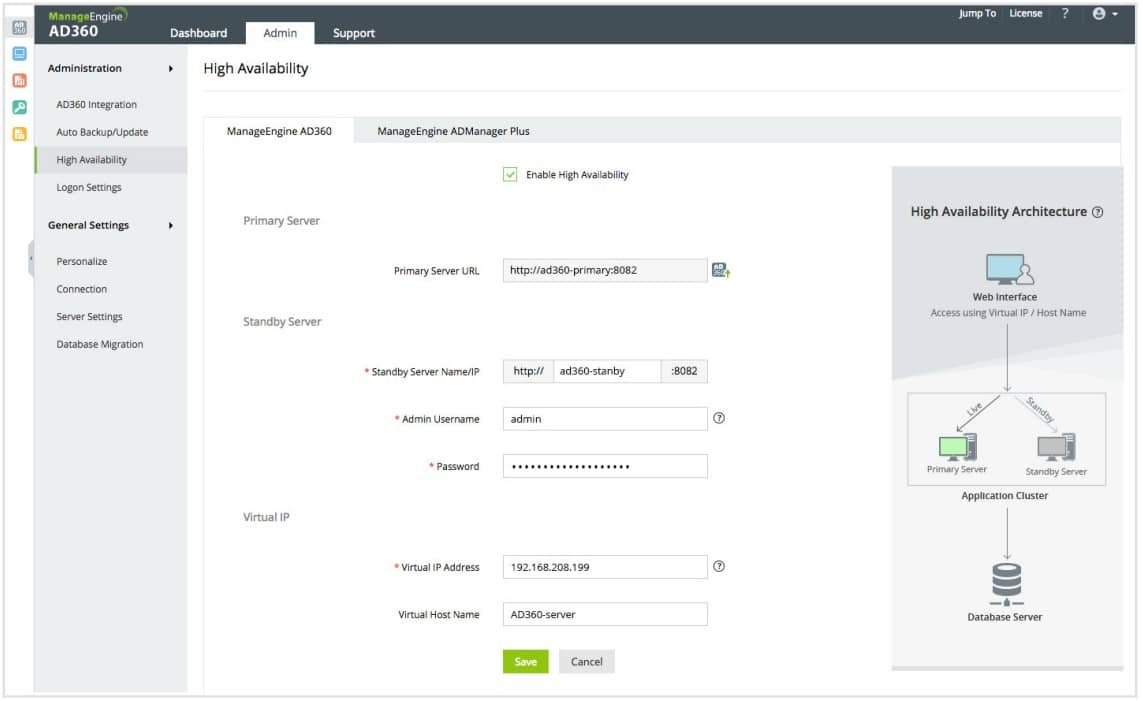
ManageEngine AD360 – FREE TRIAL
ManageEngine AD360 is an example of the type of package that will save you time. Asa well as managing backups, this system lets you upload, create, and maintain all of the objects in aloof your domain controllers no matter where they are. It also covers Azure AD and the ARM at the heart of Microsoft 365 and Google Workspaces.
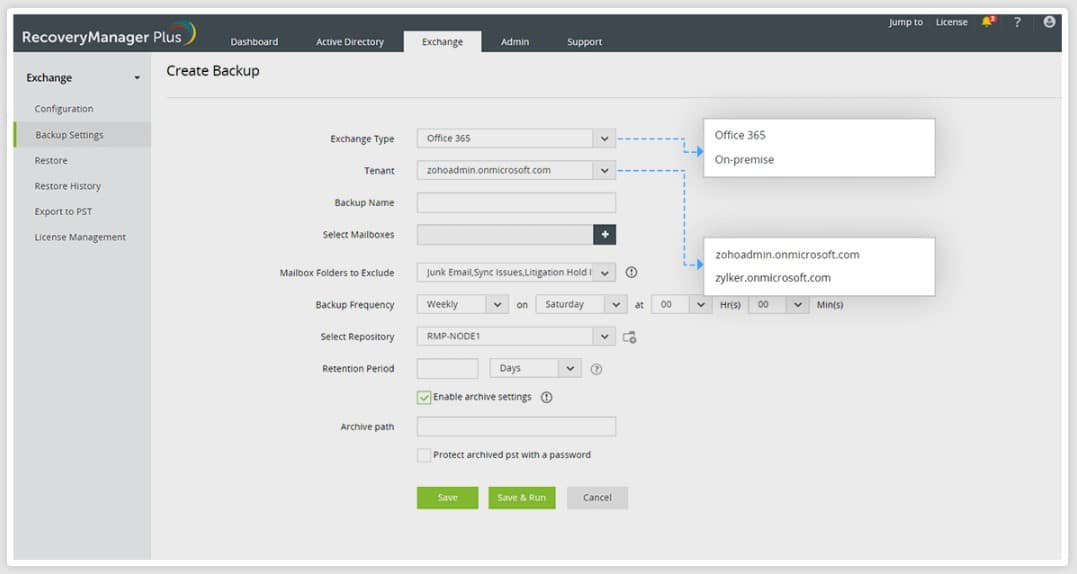
The AD360 is a collection of six AD-related ManageEngine tools, including RecoveryManager Plus. This service backs up all of your instances through one console and deploys an object-level strategy.
The AD360 service can be set up to create a version history of AD, which lets you roll back to a previous timestamp if your most recent backup gets corrupted.
Pros:
- Dramatically improves the usability of Active Directory, making routine tasks easier to perform and automate
- Can monitor changes across both local and cloud-based AD environments
- Supports SSO and MFA, great for securing your access management with multiple layers of authentication
- Extensive 60-day trial period
Cons:
- Can take time to full explore all options, integrations, and features
The AD360 software installs on Windows Server. You can access it as a service on AWS and Azure through the marketplaces of those two platforms. Assess ManageEngine AD360 with a 30-day free trial.
Final Words
The main objective of this Active Directory backup demonstration was to manually store a copy of one of the two domain controllers on the local volume of the Windows server.
We manually ran a “Backup Once” but you can also configure a “Backup Schedule,” to run regular daily backup tasks.
You can also choose between a Full Backup vs. a Custom Backup.
The full backup will create a copy of all server data, including applications, OS files, and the system state. In this demonstration, we ran a customize “System State” backup, which includes essential components needed to restore Active Directory.
As already mentioned before in the Backup Recommendations section, always backup at least once a day and follow the 3-2-1 rule.
Also, remember always to have more than one domain controller running with fault-tolerance. When one DC fails, the other one should take over.
Although you can use third-party tools to run backups, the Windows Server Backup Feature comes for free as a bundled tool, and it is really easy to use.
AD Backup FAQs
What data is stored in Active Directory?
Active Directory stores information about users, computers, and other resources in a network environment, including user accounts, passwords, group policies, and other configuration information.
What is the best way to back up Active Directory?
The best way to backup Active Directory depends on the size and complexity of the network environment. For small environments, a backup tool such as Windows Server Backup can be used. For larger environments, a third-party backup solution such as ManageEngine AD360 may be more appropriate.
How often should I back up Active Directory?
The frequency of backups should be determined based on the rate of change of the data and the criticality of the data stored in Active Directory. In general, it is recommended to backup Active Directory at least once a week, with daily incremental backups.
What is the difference between a full backup and an incremental backup?
A full backup copies all of the data in Active Directory, while an incremental backup only copies the changes made since the last backup. Incremental backups are faster and require less storage space than full backups, but they must be combined with a full backup to restore the entire Active Directory database.
Can I restore Active Directory from a backup?
Yes, it is possible to restore Active Directory from a backup, but the process can be complex and requires detailed knowledge of the network environment and the backup solution used. It is recommended to test the restore process periodically to ensure that backups are working properly.
