We may earn a commission if you make a purchase through the links on our website.
WinRM QuickConfig, HowTo Enable via GPO or Remotely on All Servers
UPDATED: February 3, 2023
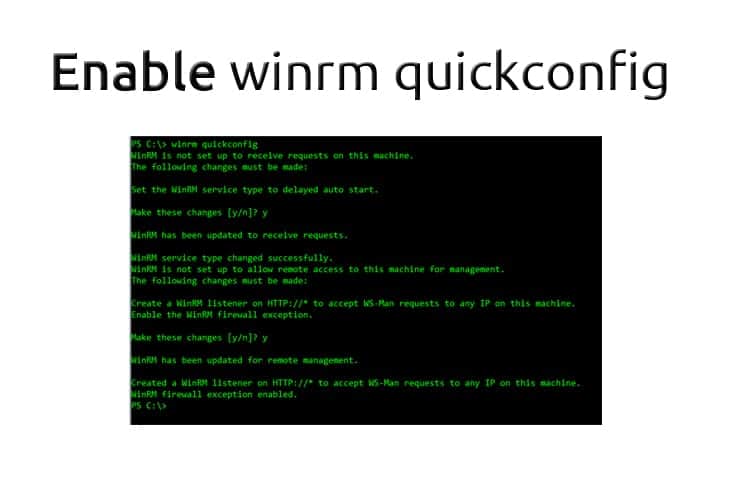
Configuring “WinRM Quickconfig” on remote computers can be a little difficult at times, especially if this is your first time using the Windows Remote Management service.
There are several ways to go about enabling winrm quickconfig on remote computers, many admins like to push the task to a GPO and others like to do it through powershell or 3rd Party programs.
We'll highlight 3 different methods we've used in the past to get Windows Remote Management service enabled, along with avoiding the dreaded “WINRM QUICKCONFIG ACCESS DENIED” error that many people get when going through this process.
3 Ways to Remotely Enable WinRM on Windows Clients/Servers:
- Download and Run this Free Utility from Solarwinds to activate it on Remote Machines
- Setup new Group Policy Object to enable the WinRM Service and Firewall Rules
- Use PSEXEC to Remotely Enable on Client Machines
1. Free Utility for Remote Activation
This is by far the easiest way if you've already configured the Windows Firewall in your network. Solarwinds has a nifty free tool called “Remote Execution Enabler for PowerShell” that has the functionality to enable and configure WinRm on local and remote hosts within your network.
Its as easy as entering in the IP Address(es) or IP Address Range of all the computers your targeting, than enter credentials that have Administrative Rights to that PC (usually accounts in the Domain Administrators Group will do the trick) and click the “START CONFIGURATION” button:
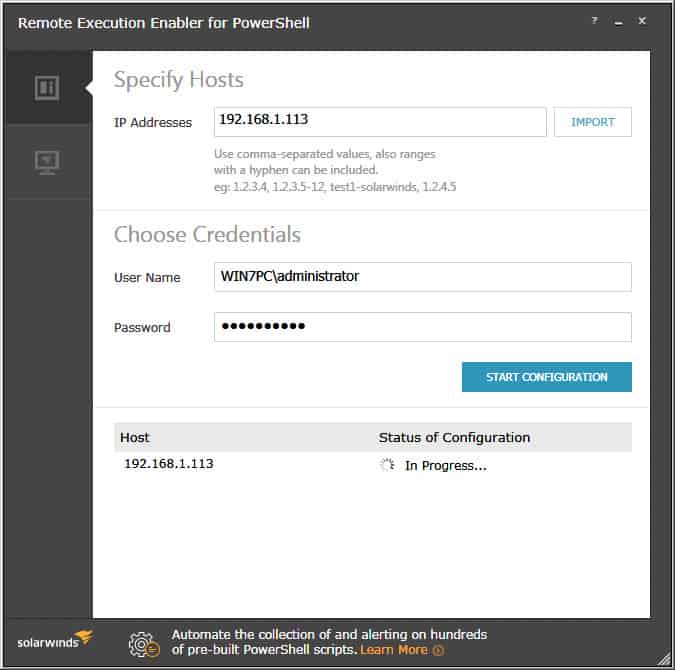
When the utility is finished starting the Windows Remote Management services on all IP Addresses or Ranges specified, you will see a green dot with a “Complete” status, as seen below:

Grab the little utility from below and give it a go:
- Open Group Policy Management from within Administrative Tools folder.
- Right-click on the desired OU that you want to create a Group Policy Object for and click on “Create a GPO in this Domain, and Link it here…“
- Rename the GPO to whatever you would like, “Enable WinRM via GPO” or something along those lines then click OK.
- Now that the new GPO has been created, right-click on the Newly created GPO and click “EDIT“.
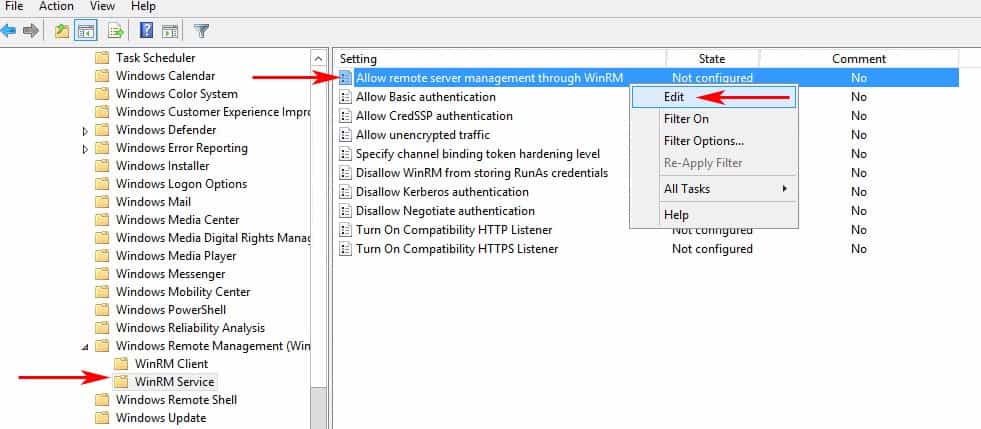
- Expand the Menu tree as follows: Computer Configuration > Policies > Administrative Templates: Policy definitions > Windows Components > Windows Remote Management (WinRM) > WinRM Service.
- Find the setting that says “Allow remote server management through WinRM” and right-click and click “EDIT” to configure the settings. (see image below)
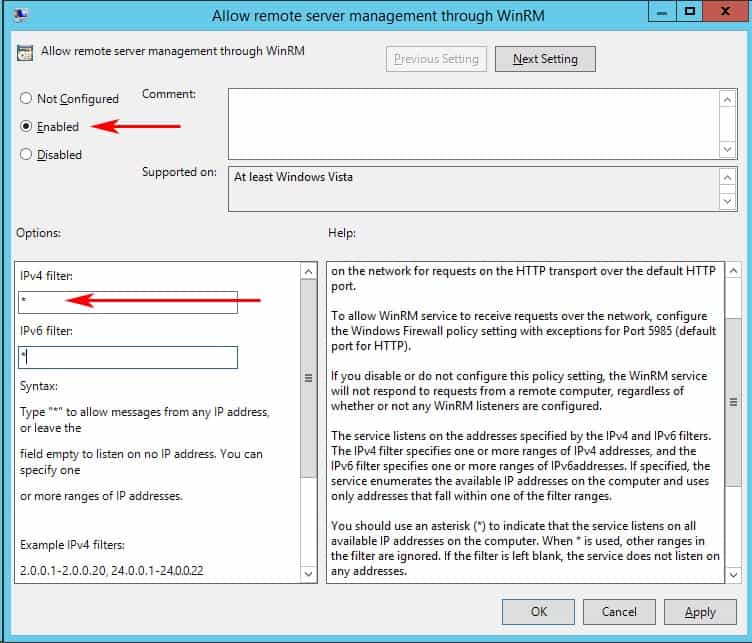
- When the dialog box opens up, click “Enabled” and under the options section, either specify an IP Address range or put an Asterisk “*” to allow all IP addresses to remotely manage the PC. (We recommend specifying an IP Address to reduce any risk of a security compromise of your systems/network).
- Now lets enable the Windows Remote Mangement (WS-Management) Service to start automatically.
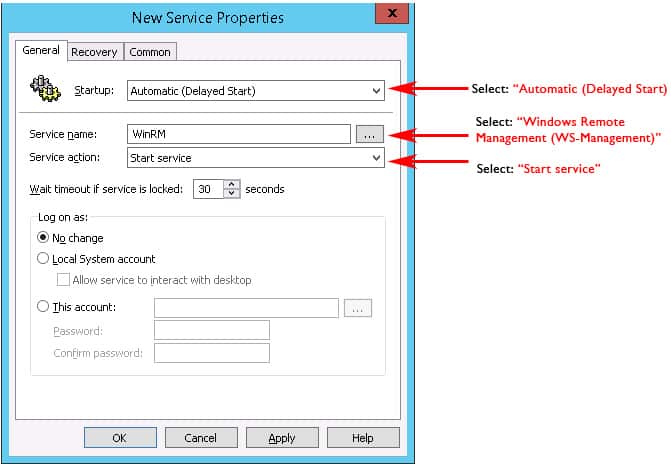
Go to Computer Configuration > Preferences > Control Panel Settings > Services and right-click and select “NEW” and the select “Service“. - A New Service Properties window will come up and you will need to change Startup to “Automatic (Delayed Start)” and then in the Service Name dialog box, click the box with the 3 dots in it to the right of the Service name box and select “Windows Remote Management (WS-Management)” and click the Select button.
- Once you've selected the Service, under the “Service action:” pull down, we'll want to click “Start service“.
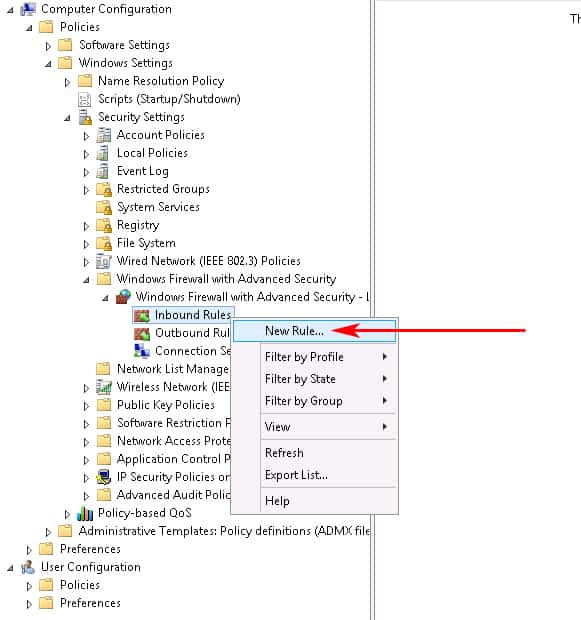
- Last Step of this Process is to configure the Windows Firewall to Allow the proper ports inbound.Go to Computer Configuration > expand Policies > expand Windows Settings > expand Security Settings > expand Windows Firewall with Advanced Security > expand Windows Firewall with Advanced Security > expand Inbound Rules.Right-click the Inbound Rules node and choose New Rule. (see screenshot below)
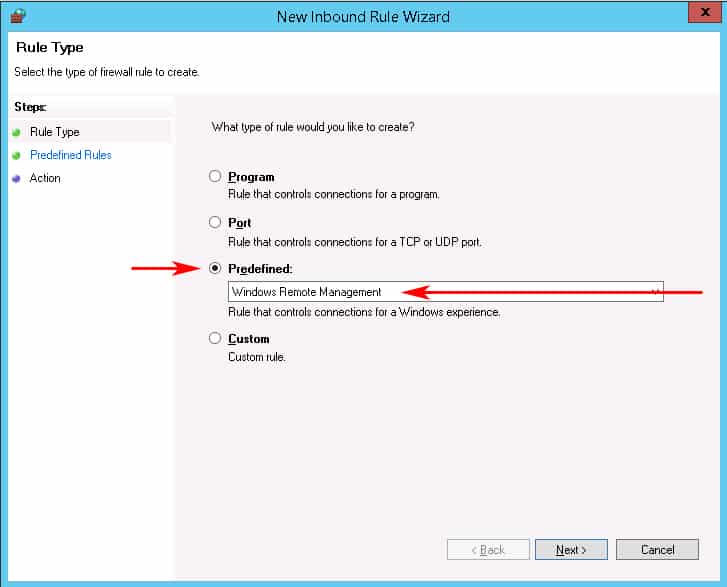
- When the New Inbound Rule wizard box opens, click on the “Predefined” radio button and scroll down to “Windows Remote Management” and click on it. (see screenshot below)
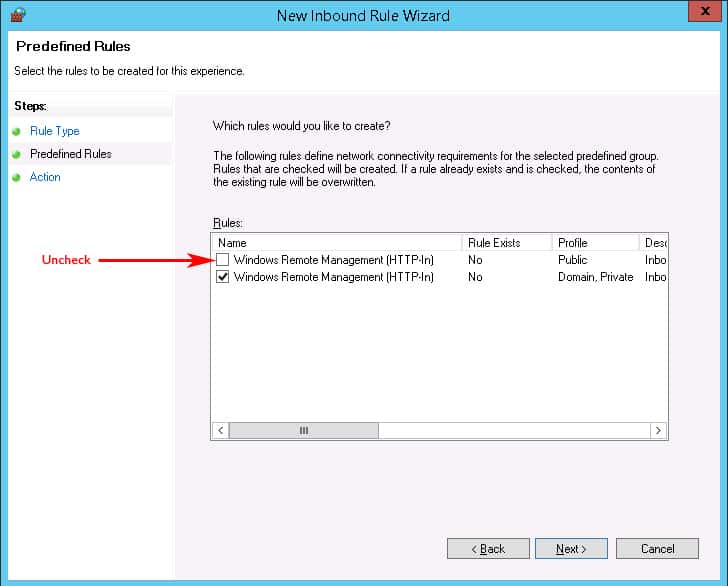
- Next we'll click on the Left Sidebar menu item that says “Predefined Rules” in order to not Allow the Firewall to open this Port to the Public network.When the window opens, uncheck the box that says Public profile next to it, as seen in the image below. This ensures that we only allow WinRM access to the Private and Domain networks.Then Click the Next button:
- The Last screen of the New Inbound Firewall Wizard will just ask whether to Allow The Connection or block it.Make sure the that “Allow the connection” radio box is checked and click Finish.
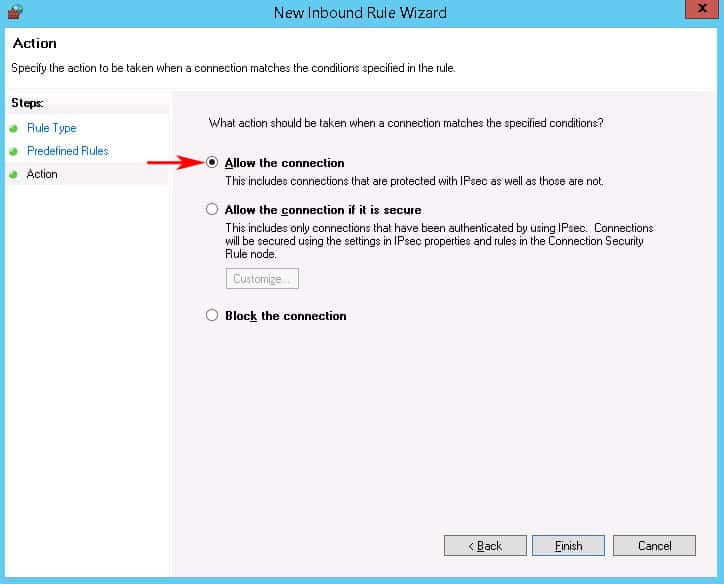
At this point, you've successfully finished the GPO and you'll need to wait for the GPO to propagate throughout your network.
3. PSEXEC for WinRM Activation
If either of the two options above don't work for you, using PSEXEC to remotely enable the service is another option, if you prefer. Here are the relevant commands you will need in order to execute “winrm quickconfig” using PSexec command line utility.
- Make sure you have PSEXEC installed on your machine and the proper “PATH” setup within your system variables – this should be automatically added when you install PSEXEC.If you dont have PSEXEC installed yet, grab the download from here (its part of the PSTOOLS package) and install it.
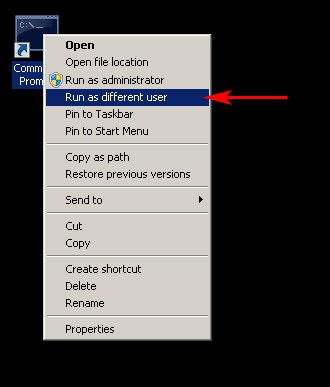
- Launch the an elevated “Command Prompt” window using your local/domain administrator account as the user of the target machine/s, to ensure that you have the necessary permissions to configure WinRM remotely on machines in your network.To run “Command Prompt” as a different user, hold the Shift Key down and right-click on the Command Prompt link and click on “Run as Different User” and then enter in a user account that has Administrator Privileges on all computers your targeting.

- Run one of the following commands below:
psexec \\ComputerName -s winrm.cmd quickconfig -qor create a text file with all the computer names you want to target and save them on your C:\ drive and run the command below to enable on all PC's in the specified text file we just created.Now you can run any one of the commands below depending on what you want to accomplishpsexec @c:\ALLComputerNames.txt -s winrm.cmd quickconfig -q
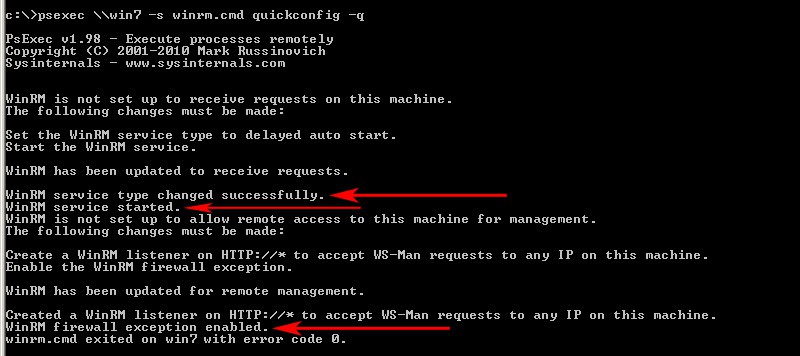
- If all goes well, you'll see a screen like the one below that confirms everything has been configured properly for WinRM on the remote machine/s.
WinRM FAQs
is WinRM the same as RDP?
WinRM and RDP are two different systems but they can be used for the same purpose, which is to get remote access to a computer and execute commands. WinRM is a text-based system but RDP shows the Desktop of the remote computer.
Is WinRM a security risk?
WinRM uses HTTP by default and that isn't secure. However, you can configure the system to use HTTPS for connections and that makes WinRM secure.
Does WinRM use TLS?
WinRM will use Transport Layer Security (TLS) if you specify that it should run its connections with HTTPS.
How does WinRM QuickConfig configure the firewall on the remote computer?
WinRM QuickConfig configures the firewall on the remote computer by adding a rule to allow incoming traffic on the WinRM port (default is 5985).
Is WinRM QuickConfig secure?
WinRM QuickConfig uses the HTTPS protocol to encrypt communication between the remote and local computers, making it secure for remote management.
What are the prerequisites for using WinRM QuickConfig on a remote computer?
The prerequisites for using WinRM QuickConfig on a remote computer include having administrative privileges on both the local and remote computers and having network connectivity between the computers.
How can I verify that WinRM is configured correctly on a remote computer?
To verify that WinRM is configured correctly on a remote computer, you can use the “WinRM Id” command to retrieve information about the remote computer and the WinRM configuration. If the command returns information about the remote computer and the WinRM configuration, it means that WinRM is configured correctly.
Related Articles:
What Is WinRM? Windows Remote Management command-line Utility


Download Free!
2. Setup via Group Policy Object (GPO)
If the above solution didn't work for you, then setting up a GPO to do all the configuration is the next best thing, as you can assign it to any given computer or OU if necessary. Below are instructions for Windows 2012 R2 Server GPO setup.