We may earn a commission if you make a purchase through the links on our website.
Cisco Commands – Guide to the Most Important Cisco IOS Commands
UPDATED: March 21, 2023
As a novice in the Cisco networking world, I wondered how I will ever be able to “cram” all the possible Cisco IOS commands. Of course, I have come to realize that you definitely don’t need to know all the commands available on the Cisco IOS (probably not even realistic; that’s what the “?” help is for).
However, you will be better off knowing the commands necessary to configure common features such as host names, IP addresses, access control lists, routing protocols, and so on which is where a cisco commands cheat sheet comes in really handy. Even more important is the skill to know which show command to use to view certain information on the device.
In this article, we will discuss five (5) common Cisco IOS show commands. To make this article as practical as possible, we will run through a troubleshooting scenario together, using the show commands as we go along, and fixing the issues we find.
Common Cisco IOS Show Commands
Imagine that you are a freelancer and you have just gotten a project to troubleshoot a network made up of Cisco IOS devices as shown below:
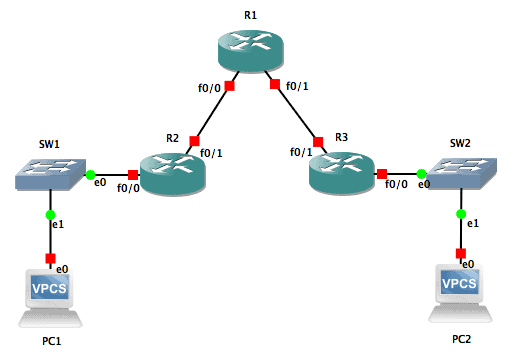
The only information you have been given is the IP address table below, which shows how the network should be configured:
| Device | Interface | IP address |
| R1 | Fa0/0 | 10.1.12.1/24 |
| Fa0/1 | 10.1.13.1/24 | |
| R2 | Fa0/0 | 192.168.10.1/24 |
| Fa0/1 | 10.1.12.2/24 | |
| R3 | Fa0/0 | 192.168.20.1/24 |
| Fa0/1 | 10.1.13.3/24 | |
| PC1 | E0 | 192.168.10.100/24 |
| PC2 | E0 | 192.168.20.100/24 |
You have been told that the two PCs cannot communicate with each other. Since this is a network you are not familiar with, you will need to use some commands to quickly come up to speed on the state of the network, and possibly find and fix the issues discovered.
Using this scenario, let’s look at five (5) common show commands you are likely to use during your troubleshooting exercise.
show running-config
The first command on the list is the show running-config command. This command shows you the entire configuration that is currently running on the Cisco IOS device. This is as opposed to the “startup configuration” which is the configuration used by the device when it starts/boots up.
To understand the difference between the running and startup configuration, imagine a Microsoft Word file that contains a list of ten (10) names. Think of this as the “startup configuration”. Now, let’s say you open that file and add another name to the list, making it 11 names. At this point, the “running configuration” (11 names) is different from the “startup configuration” (10 names). To make them the same, you can either:
- Save the file, meaning that the running configuration overwrites the startup configuration.
- Close without saving meaning that the startup configuration is not altered.
Back to our scenario, you can use the show running-config command to quickly get an idea of the configuration on the device. You will want to pay attention to interface configurations, access control lists (if any), NAT configurations if available, and so on.
Note: Most people abbreviate the show running-config as show run or even sh run which is also accepted on Cisco devices.
For example, the running configuration on R1 is as shown below:
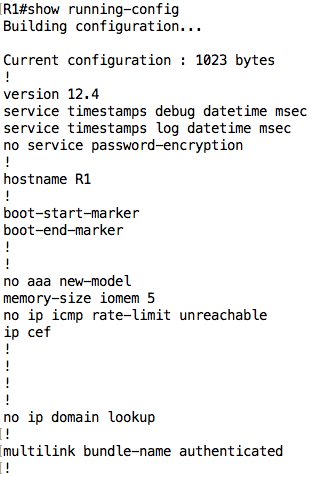
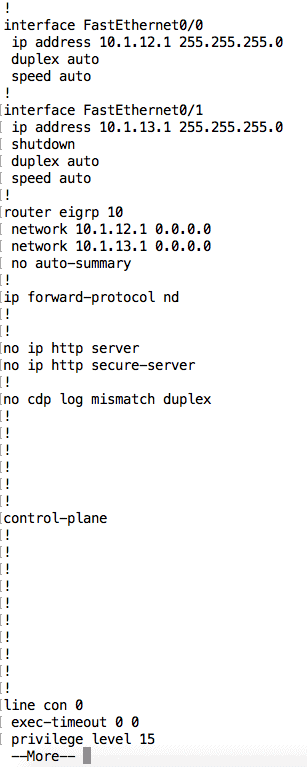
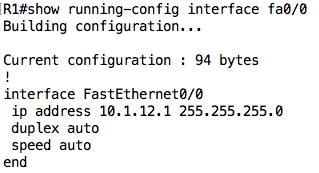
You probably don’t want to spend too much time going through the entire configuration at once because it can get overwhelming especially for large configuration files. As such, you can move on to other show commands that deal with specific areas (discussed below), or you can use some of the options associated with the show running-config command:
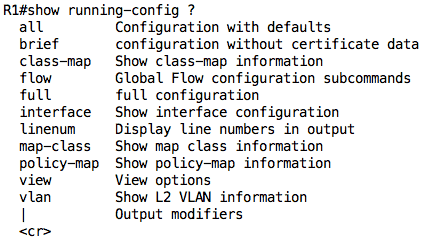
For example, we can view the configuration on a particular interface using the show running-config interface <interface name> command:

show ip interface brief
The next command on the list is the show ip interface brief command, usually abbreviated as show ip int br. This is one of the most useful Cisco IOS commands because it allows you to quickly see all the interfaces on a Cisco device, their IP address, their method of configuration (manual, DHCP, TFTP, etc.), and their hardware and line protocol status.
Let’s start with R1:

Note: This command does not show you the subnet mask configured on an interface. To view the subnet mask, you can use the show ip interface command without the brief option.
We can see that the IP addresses configured on the interfaces are correct (according to the IP address table) but notice that the status of the FastEthernet0/1 interface is showing as “administratively down”. This tells us that the interface is in the shutdown state.
We can confirm using the show running-config interface command:
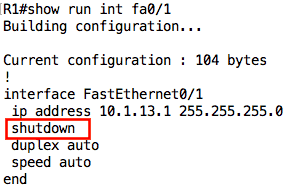
We can fix this by going under the interface and issuing the no shutdown command:


Let’s now move on to R2:

If you are not careful, you will miss what is wrong on this device – the Fa0/1 interface is configured with an IP address of 10.1.21.2 instead of 10.1.12.2. Let’s quickly fix this before moving on:

Finally, let’s look at R3:

Everything seems to be fine on R3. Just to be on the safe side, let’s confirm the subnet masks configured on those interfaces using the plain show ip interface command:
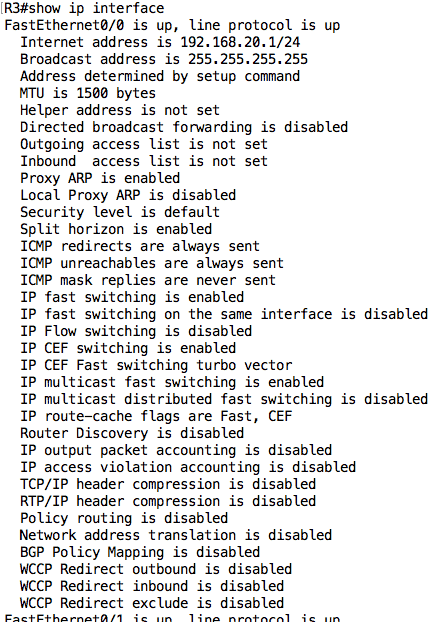

As you can see, the show ip interface command without any options also provides a lot of useful information such as access control lists applied on an interface, policy routing and NAT configuration, and even the type of packet switching being used on that interface (e.g. CEF).
show interfaces
The next command we will consider is the show interfaces command, usually abbreviated as show int. This command deals more with the physical attributes of the interface such as the MAC address, duplex settings, and input/output packet statistics, unlike the previous show ip interface command that focuses more on Layer 3+ configuration. If this command is used without options, it will display information about all the interfaces on the device.
You can also specify a particular interface to view:

Even though this command is not useful in our particular troubleshooting scenario, let’s look at some sections of the output of this command:
- The MAC address of this interface is C203:14E2:0001. This is also the burned-in address (BIA) which means the MAC address of this interface has not been manually configured.
- The MTU, Bandwidth (BW), Delay (DLY), Reliability, and Load (txload, rxload) values are useful for protocols like EIGRP.
- The Encapsulation section provides information about the layer 2 encapsulation being used on that interface. This is especially useful for Serial interfaces e.g. PPP encapsulation.
- The bottom section shows statistics about packets coming in (input) and going out (output) of that interface.
Tip: The show interfaces status and show interfaces trunk commands provide very useful information on Cisco IOS switches.
show ip route
Whenever you are troubleshooting a Layer 3 problem, you always need to make sure that basic routing is working which is where the next command comes in – show ip route. This command provides information about the IPv4 routing table on the Cisco device, including connected and non-connected routes.
Tip: The equivalent command for IPv6 is show ipv6 route.
Let’s start with R1:
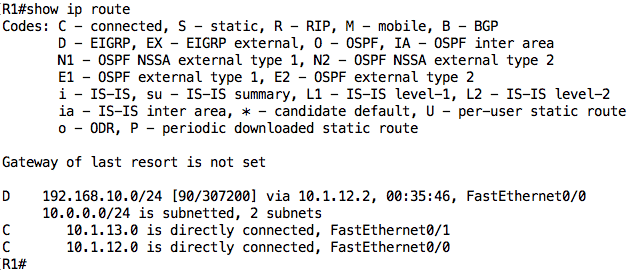
Notice that there are two connected routes (marked as “C”) and one EIGRP route (marked as “D”). For non-connected routes, the route is associated with a metric (e.g. [90/307200]), next-hop (e.g. via 10.1.12.2), and in some cases, the interface through which traffic to that destination should be sent.
Note: On some Cisco IOS versions, each connected route will have an associated “L” route showing the particular IP address configured on the interface (as a /32).
The EIGRP route tells me that R1 is running EIGRP and from the next-hop information, I can see that the EIGRP neighbor is R2. Therefore, all things being equal, if I ping PC1 (192.168.10.100) from R1, it should go through because R1 has a route to that destination (and PC1 is configured to use R2 as its default gateway):
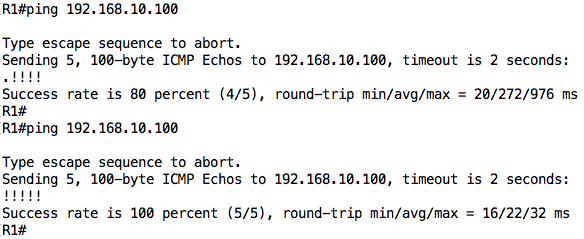
However, R1 does not have a route for the network behind R3 i.e. 192.168.20.0/24:

Warning: Be careful about the conclusion you draw when you see the message “Network not in table” because it only means that the exact route is not in the routing table; another route that covers that route (e.g. 0.0.0.0/0) may exist in the routing table.
Since R1 does not know how to reach that 192.168.20.0/24 subnet, ping from R1 to PC2 will fail:

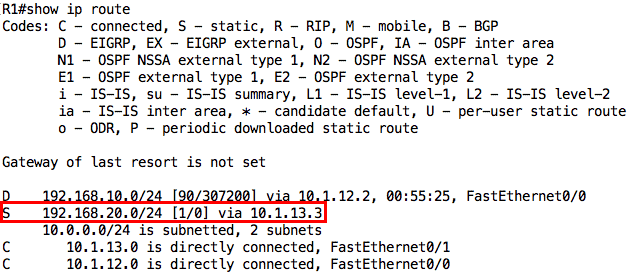
For this task, we will assume that static routes should be used. Therefore, I will configure a static route on R1 for the 192.168.20.0/24 subnet pointing to R3:

If we check the routing table on R1 again, that route should be there (marked as “S” for static):
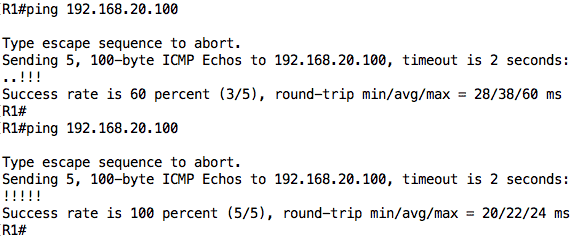
should work now:
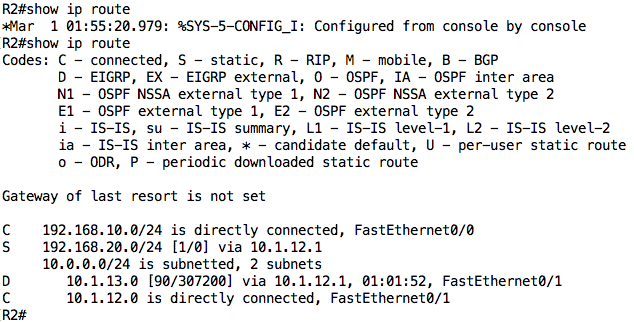
Let’s now move to R2 and check its own routing table:
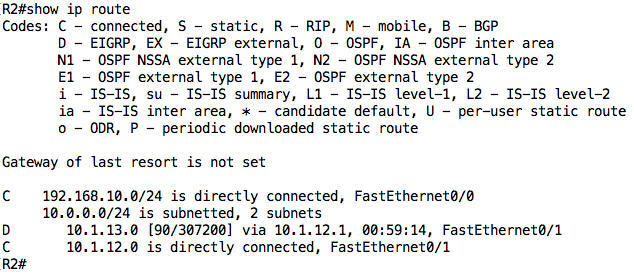
Since PC1 must be able to communicate with PC2, R2 (PC1’s default gateway) must have a route to 192.168.20.0/24. Let’s configure a static route to accomplish this. This static route has to point to R1 because R1 is R2’s only connection to R3:
![]()
Finally, let’s check the routing table on R3:
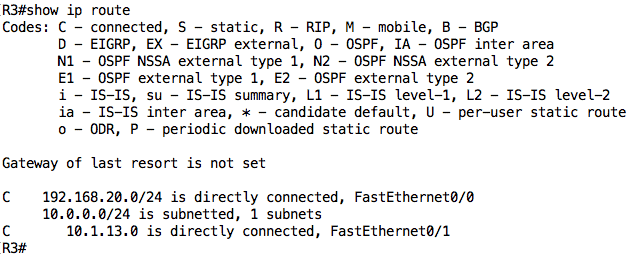
With its current routing table, R3 can only communicate with devices on directly connected networks i.e. R1 and PC2. Let’s configure a default route on R3 such that all traffic to unknown destinations is sent to R1:

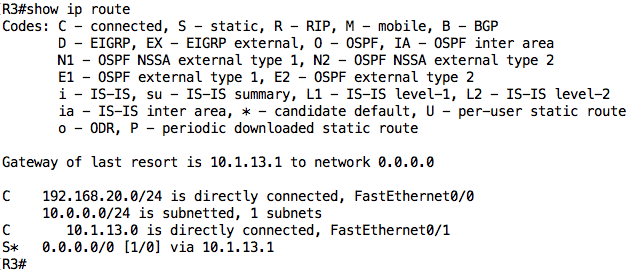
Looking at the output above, we notice two changes (which are related):
- The “Gateway of last resort” is now set to 10.1.13.1
- There is a default route (marked as “S*”) in the routing table pointing to R1
With this configuration, PC1 should now be able to ping PC2 since there is end-to-end routing on the network:

We can also test from PC2 to PC1:

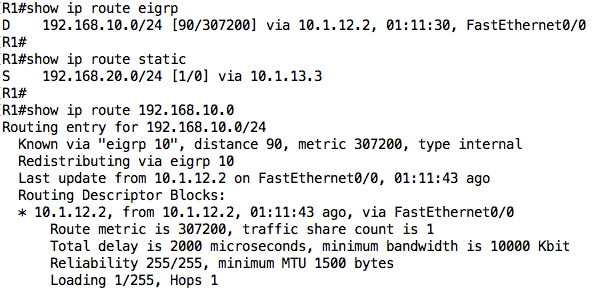
Before we leave the show ip route command, note that it has several options including viewing information about a specific route and about specific routing protocols:
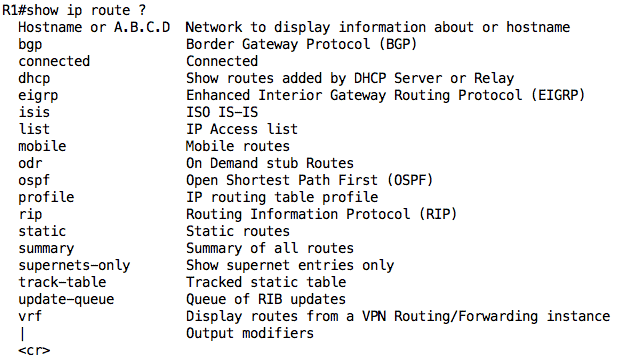
Examples are as shown below:
show version
Even though our troubleshooting session is now done and we have fixed the problem, the last useful Cisco IOS command we will talk about is the show version command. This command provides the software and hardware details of a device.
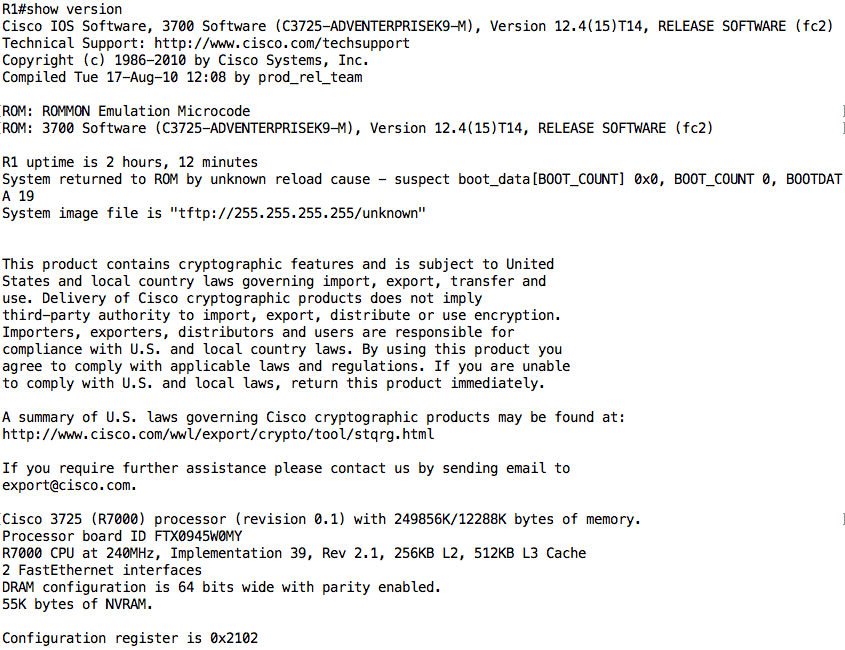
Here are examples of when information from the show version command can come in handy:
- Device inventory: You can get both the hardware (e.g. Cisco 3725) and software (e.g. C3725-ADVENTERPRISEK9-M, VERSION 12.4(15)T14) information using this command.
- Available features: Using the information about the hardware/software, you can determine which features are supported (or not) on this device. For example, I once built a solution for a client in a test environment and when it was time to deploy the solution, I discovered that the feature we tested in the lab was not supported on the client’s device. Huge fail!
- Useful information about CPU, memory size, RAM, and so on.
- Information about the configuration register which affects the boot behavior of the device.
Bonus Tip
Two features that can improve the experience of using show commands are:
- The do command which allows you to run exec-level commands from config mode
- Pipe ( i.e. “|”) which allows you to filter the output of a command
Here is an example without and with the do command:

Below is an example of piping:
The options that can be used with the pipe are as shown below (subject to device/IOS version):

Of course, you can combine both features:

Conclusion
This brings us to the end of this article where we have looked at five (5) common Cisco IOS commands including:
- show running-config
Which displays the current running configuration on the device - show ip interface brief
Lets us quickly see basic information (such as IP address and status) about all interfaces on a device - show interfaces
Provides information and statistics about interfaces - show ip route
Displays the IPv4 routing table on a device - show version
Provide software and hardware details about a device
Cisco IOS Commands FAQs
How do I configure a Cisco device using the CLI?
To configure a Cisco device using the CLI, you must first access the Cisco CLI, then enter configuration mode using the "configure terminal" command. From there, you can enter the appropriate commands to configure the device.
How do I save my Cisco configuration changes?
To save your Cisco configuration changes, you can use the "copy running-config startup-config" command. This will save the current configuration to the startup configuration, so that the changes persist even after a device restart.
How do I troubleshoot a Cisco device using the CLI?
To troubleshoot a Cisco device using the CLI, you can use the "show" command to view the current configuration and status of the device, and the "ping" command to test network connectivity.
What is the difference between the "running-config" and "startup-config"?
The "running-config" is the configuration that is currently in use by the device, while the "startup-config" is the configuration that will be loaded when the device is restarted.
What should I do if I make a mistake while configuring a Cisco device using the CLI?
If you make a mistake while configuring a Cisco device using the CLI, you can use the "no" command to undo the change, or use the "exit" command to exit configuration mode without saving changes. In some cases, you may need to reset the device to its original configuration.