We may earn a commission if you make a purchase through the links on our website.
How to Set Up a VLAN
UPDATED: July 11, 2023
If you want to improve your network security and performance, learning how to set up a VLAN properly is all you need. Virtual LANs are powerful networking tools that allow you to segment your network into logical groups and isolate traffic between them.
In this post, we will go through the steps required to set up a VLAN in your network. We will configure two switches along with their interfaces and VLANs, respectively.
So, let’s dive in and learn how to set up VLANs and take your network to the next level.
Table of Contents
- What is a VLAN?
- Preparing for VLAN configuration
- Our Lab
- Network Diagram
- How to set up a VLAN on a Switch?
- Let’s connect to the Switch
- Configure VLANs
- Assign switch ports to VLANs
- Configure trunk ports
- Extra Configuration to Consider
What is a VLAN?
Before we go deep into learning how to set up a VLAN and provide examples, let’s understand the foundations of VLANs (or Virtual Local Area Networks).
In a nutshell, VLANs are logical groupings of devices that rely on Layer 2 addresses (MAC) for communication. VLANs are implemented to segment a physical network (or large Layer two broadcast domains) into multiple smaller logical networks (isolated broadcast domains).
Each VLAN behaves as a separate network with its own broadcast domain. VLANs help prevent broadcast storms (extreme amounts of broadcast traffic). They also help control traffic and overall improve network security and performance.
Preparing for VLAN configuration
Although VLANs are usually left for Layer 2 switches, in reality, any device (including routers and L3 switches) with switching capabilities and support of VLAN configuration should be an excellent fit for VLANs. In addition, VLANs are supported by different vendors, and since each vendor has a different OS and code, the way the VLANs are configured may slightly change.
Furthermore, you can also use specific software such as network diagramming and simulation to help you create network diagrams and test your configuration.
Our Lab
We will configure a popular Cisco (IOS-based) switch for demonstration purposes. We will use Boson NetSim (a network simulator for Cisco networking hardware and software) to run Cisco IOS simulated commands. This simulation is like you were configuring an actual Cisco switch or router.
Network Diagram
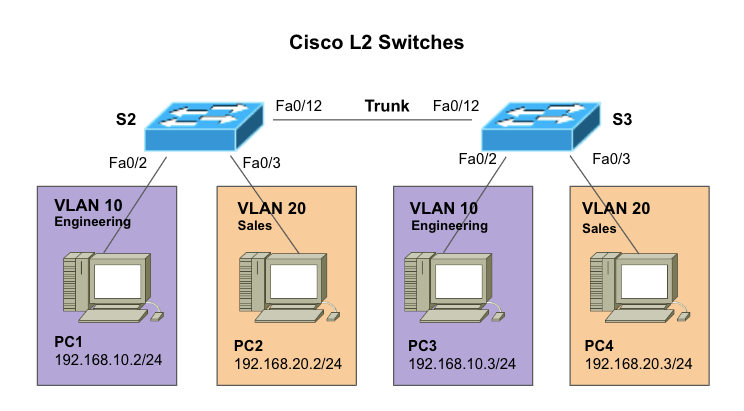
To further illustrate how to set up a VLAN, we will work on the following network diagram. We will configure two VLANs in two different switches. We will then configure each port on the switches connected to a PC. We will then proceed to configure the trunk port, which is vital for VLAN traffic.
Network diagram details
- S2 and S3 (Switch 2 and Switch 3) – Two Cisco L2 Switches connecting PCs at different VLANs (VLAN 10 and VLAN 20) via Fast Ethernet interfaces.
- VLANs 10 and VLAN20. These VLANs configured in L2 switches (S2 and S3) create a logical grouping of PCs within the network. In addition, each VLAN gets a name, VLAN 10 (Engineering) and VLAN 20 (Sales).
- PCs. PC1, PC2, PC3, and PC4 are each connected to a specific L2 switch.
How to set up a VLAN on a Switch?
So now that you know the VLAN configuration we will be using, including the number of switches, VLAN ID, VLAN name, and the devices or ports that will be part of the configuration, let’s start setting up the VLANs.
Note: VLAN configuration is just a piece of the puzzle. Switches also need proper interface configuration, authentication, access, etc. To learn how to correctly connect and configure everything else, follow the step-by-step guide on how to configure a Cisco Switch.
a. Let’s connect to the switch
Inspect your hardware and find the console port. This port is usually located on the back of your Cisco switch. You can connect to the switch’s “console port” using a console cable (or rollover). Connect one end of the console cable to the switch’s console port and the other to your computer’s serial port.
Note: Obviously, not all modern computers have serial ports. Some modern switches come with a Mini USB port or AUX port to help with this. But if your hardware doesn't have these ports, you can also connect to the switch port using special cables like an RJ-45 rollover cable, a Serial DB9-to-RJ-45 console cable, or a serial-to-USB adapter.
- Depending on your switch’s model, you can configure it via Command Line Interface (CLI) or Graphical User Interface (GUI). We will connect to the most popular user interface: The IOS-based CLI.
- To connect to your switch’s IOS-based CLI, you must use a terminal emulator on your computer, such as PuTTY or SecureCRT.
- You’ll need to configure the terminal emulator to use the correct serial port and set the baud rate to 9600. Learn how to properly set these parameters in the Cisco switching configuration guide.
- In the terminal emulator, press Enter to activate the console session. The Cisco switch should display a prompt asking for a username and password.
- Enter your username and password to log in to the switch.
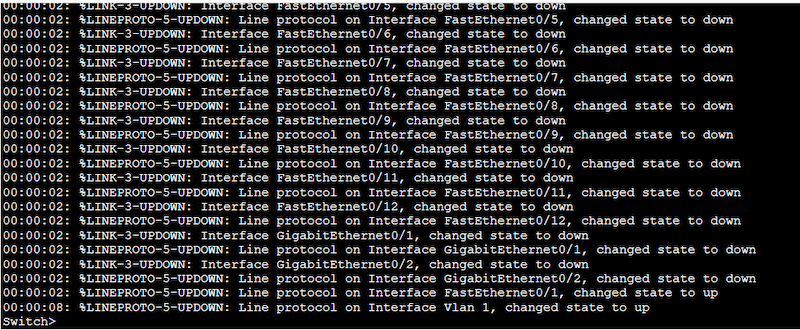
b. Configure VLANs
According to our previously shown network diagram, we will need two VLANs; VLAN 10 and VLAN 20.
- To configure Layer 2 switches, you need to enter the privileged EXEC mode by typing “enable” and entering the password (if necessary).
- Enter the configuration mode by typing “configure terminal.”
- Create the VLAN with “vlan <vlan ID>” (e.g., “vlan 10”).
- Name the VLAN by typing “name <vlan name>” (e.g., “name Sales”).
- Repeat these two steps for each VLAN you want to create.
Configuration on Switch 2 (S2)
S2# configure terminal
S2(config)# vlan 10
S2(config-vlan)# name Engineering
S2(config-vlan)# end
S2# configure terminal
S2(config)# vlan 20
S2(config-vlan)# name Sales
S2(config-vlan)# end
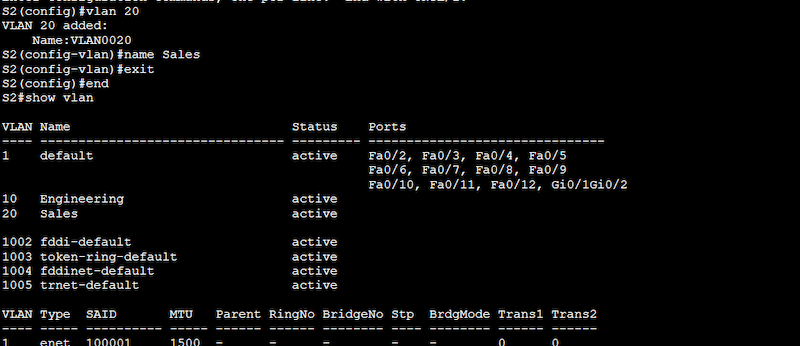
Use the “show vlan” command to see the configured VLANs. From the output below, you’ll notice that the two new VLANs 10 (Engineering) and 20 (Sales) are indeed configured and active but not yet assigned to any port.
Configuration on Switch 3 (S3)
S3# configure terminal
S3(config)# vlan 10
S3(config-vlan)# name Engineering
S3(config-vlan)# end
S3# configure terminal
S3(config)# vlan 20
S3(config-vlan)# name Sales
S3(config-vlan)# end
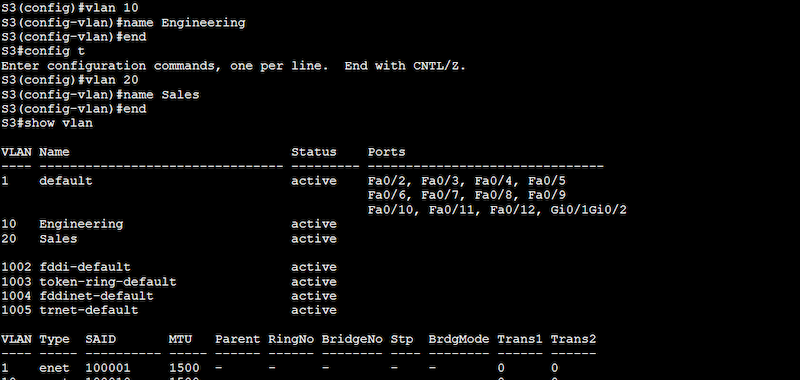
Note: From the output above, you might have noticed VLAN 1 (default), which is currently active and is assigned to all the ports in the switch. This VLAN, also known as native VLAN, is the default VLAN on most Cisco switches. It is used for untagged traffic on a trunk port. This means that all traffic that is not explicitly tagged with VLAN information will be sent to this default VLAN.
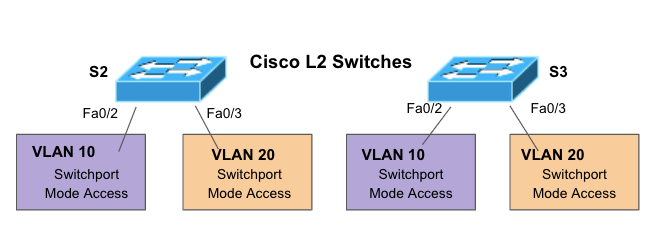
Now, let’s remove those VLAN 1 tags from interfaces Fa0/2 and Fa0/3. Or in simple words let's assign the ports to our newly created VLANs.
c. Assign switch ports to VLANs
In the previous section, we created our VLANs; now, we must assign the appropriate switch ports to the correct VLANs. The proper steps to assign switch ports to VLANs are as follows:
- Enter configuration mode. Remember to run these commands under the configuration mode (configure terminal).
- Assign ports to the VLANs by typing “interface <interface ID>” (e.g., “interface GigabitEthernet0/1”).
- Configure the port as an access port by typing “switchport mode access”
- Assign the port to a VLAN by typing “switchport access vlan <vlan ID>” (e.g., “switchport access vlan 10”).
- Repeat these steps for each port you want to assign to a VLAN.
Let’s refer to a section of our network diagram
Configuration on Switch 2 (S2)
S2(config)# interface fastethernet 0/2
S2(config-if)# switchport mode access
S2(config-if)# switchport access vlan 10
S2(config)# interface fastethernet 0/3
S2(config-if)# switchport mode access
S2(config-if)# switchport access vlan 20
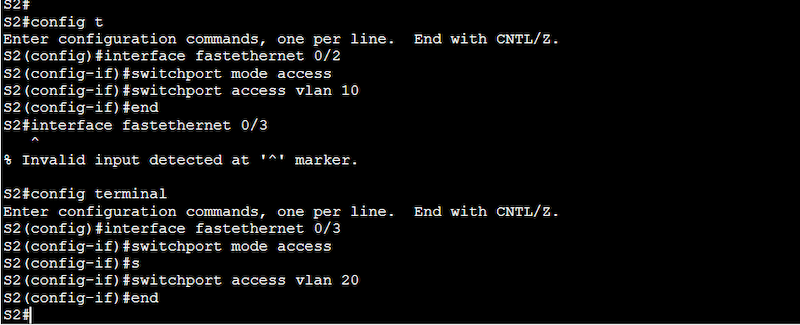
Use the “show running-configuration” to see the new configuration taking effect on the interfaces.
Configuration on Switch 3 (S3)
S3(config)# interface fastethernet 0/2
S3(config-if)# switchport mode access
S3(config-if)# switchport access vlan 10
S3(config)# interface fastethernet 0/3
S3(config-if)# switchport mode access
S3(config-if)# switchport access vlan 20

A “show running-configuration” can show you our configuration results.

d. Configure trunk ports
Trunk ports are a type of switch port mode (just like access) that perform essential tasks like carrying traffic for multiple VLANs between switches, tagging VLAN traffic, supporting VLAN management, increasing bandwidth efficiency, and allowing inter-VLAN routing.
If we didn’t configure trunk ports between our switches, the PCs couldn’t talk to each other on different switches, even if they were on the same VLAN.
Here’s a step by step to configuring trunk ports
- Configure a trunk port to carry traffic between VLANs by typing “interface <interface ID>” (e.g., “interface FastEthernet0/12”).
- Set the trunk encapsulation method (dot1q). The IEEE 802.1Q (dot1q) trunk encapsulation method is the standard tagging Ethernet frames with VLAN information.
- Configure the port as a trunk port by typing “switchport mode trunk”.
- Repeat the steps for each trunk port you want to configure.
Note (on redundant trunk links): To keep our article simple, we will configure one trunk link. However, keep in mind that any good network design (including trunk links) would need redundancy. One trunk link between switches is not an optimal redundant solution for networks on production. To add redundancy, we recommend using EtherChannel to bundle physical links together and configure the logical link as a trunk port. You can also use Spanning Tree Protocol (STP) by using the “spanning-tree portfast trunk” command.
Let’s refer to our network diagram

Configuration on Switch 2 (S2)
S2(config)# interface fastethernet 0/12
S2(config-if)# switchport trunk encapsulation dot1q
S2(config-if)# switchport mode trunk
S2(config-if)# exit

Configuration on Switch 3 (S3)
S3(config)# interface fastethernet 0/24
S3(config-if)# switchport trunk encapsulation dot1q
S3(config-if)# switchport mode trunk
S3(config-if)# exit

Note: You can use different types of trunk encapsulation such as dot1q and ISL, just make sure both ends match the type of encapsulation.
Extra Configuration to Consider
Once you finish with VLAN and trunk configuration, remember to test VLAN connectivity between PCs, you can do this by configuring the proper IP addressing and doing a simple ping. Below are other key configurations related to your new VLANs that you might want to consider.
a. Ensure all your interfaces are up and running
To ensure that your interfaces are not administratively down, issue a “no shutdown” (or ‘no shut') command on all those newly configured interfaces. Additionally, you can also use the “show interfaces” to see the status of all the interfaces.

b. (Optional) enable inter-VLAN
VLANs, as discussed earlier, separate broadcast domains (Layer 2) — they do not know how to route IP traffic because Layer 2 devices like switches can’t accept IP address configuration on their interfaces. To allow inter-VLAN communication (PCs on one VLAN communicate with PCs on another VLAN), you would need to use a Layer 3 device (a router or L3 switch) to route traffic.
There are three ways to implement inter-VLAN routing: an L3 router with multiple Ethernet interfaces, an L3 router with one router interface using subinterfaces (known as Router-On-a-Stick), and an L3 switch with SVI.
We will show a step-by-step on how to configure Router-On-a-Stick for inter-VLAN communications.
- Connect the router to one switch via a trunk port.
- Configure subinterfaces on the router for each VLAN (10 and 20 in our example). To configure subinterfaces, use the “interface” command followed by the VLAN number with a period and a subinterface number (e.g., “interface FastEthernet0/0.10” for VLAN 10). For example, to configure subinterfaces for VLANs 10 and 20, you would use the following commands:
> router(config)# interface FastEthernet 0/0
> router(config-if)# no shutdown
> router(config-if)# interface FastEthernet 0/0.10
> router(config-subif)# encapsulation dot1Q 10
> router(config-subif)# ip address 192.168.10.1 255.255.255.0
> router(config-subif)# interface FastEthernet 0/0.20
> router(config-subif)# encapsulation dot1Q 20
> router(config-subif)# ip address 192.168.20.1 255.255.255.0
- Configure a default route on the router using the “ip route” command. This is a default route to the Internet through a gateway at IP address 192.168.1.1. For example:
> router(config)# ip route 0.0.0.0 0.0.0.0 192.168.1.1
c. Configure DHCP Server
To automatically assign IP addresses to devices inside the VLANs, you will need to configure a DHCP server. Follow these steps:
- The DHCP server should also be connected to the VLAN.
- Configure the DHCP server to provide IP addresses to devices in the VLAN.
- Configure the router to forward DHCP requests to the DHCP server by typing “ip helper-address <ip address>” (e.g., “ip helper-address 192.168.10.2”).
Final Words
By following the steps outlined in this post, you can easily set up a VLAN on your switch and effectively segment your network. Keep in mind to thoroughly test your VLAN configuration and consider additional configuration options to optimize your network for your specific needs.
With proper setup and configuration, VLANs can greatly enhance your network's capabilities and 10x increase its performance and security.